> ## Documentation Index
> Fetch the complete documentation index at: https://docs.phospho.ai/llms.txt
> Use this file to discover all available pages before exploring further.
# Control robot with AI models
> How to make an AI model control your robot?
You just [trained an AI model](/basic-usage/training) and now you want to use it to control your robot. Let's see how you can do that.
Disclaimer: Letting an AI control your robot carries risk. Clear the area from
pets, people and objects. You are the only one **responsible** for any damage
caused to your robot or its surroundings.
## Control your robot with AI from the phosphobot dashboard
If you trained your model using phosphobot, you can control your robot directly from the phosphobot dashboard.
You can fine tune the model in a single click from the dashboard. [Go here to
learn how.](/basic-usage/training)
1. **Connect your robots and your cameras** to your computer. **Run the phosphobot server** and go to the phosphobot dashboard in your browser: [http://localhost](http://localhost)
```bash theme={null}
phosphobot run
```
2. Create a phospho account or log in by clicking on the **Sign in** button in the top right corner.
3. *(If not already done)* Add your Hugging Face token in the **Admin Settings** tab with **Write authorization**. [Read the full guide here](/basic-usage/dataset-recording#1-set-up-your-hugging-face-token).
4. In the **AI Training and Control** section, enter the instruction you want to give the robot and click on **Go to AI Control**. Accept the disclaimer. You'll be redirected to the AI Control page.
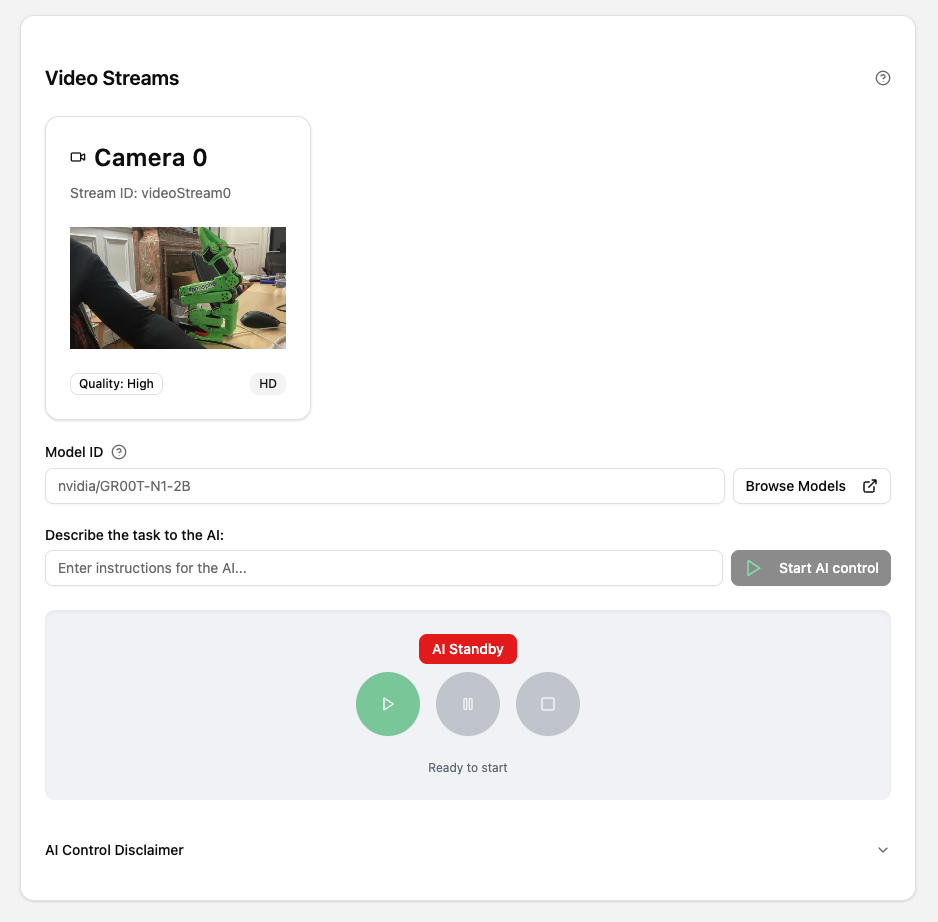 5. In the **Model ID**, enter the name of your model on Hugging Face (example: `phospho-app/YOUR_DATASET_NAME-A_RANDOM_ID`). Double check the camera angles so that they match the ones you used to record the dataset.
6. Click on **Start AI Control**. Please wait: the first time, starting a GPU instance and loading the model can take up to 60 seconds. Then the robot will start moving.
You can pause, resume, and stop the AI control at any time by clicking on the control buttons.
If your model supports it, you can edit the **Instruction** field to change the instruction and run it again to see how the robot reacts.
Join the Discord to ask questions and share your demos!
## How to control your robot with an AI model from a python script?
If you're using a different model or want more fine-grained control, you can use the `phosphobot` python module to control your robot with an AI model.
### 1. Setup an inference server
First, you need to setup an inference server. This server runs on a beefy machine with a GPU that can run the AI model. It can be your own machine, a cloud server, or a dedicated server.
If you choose a remote location, chose the closest location to minimize
latency.
To setup the inference server, follow the instructions in the link below:
How to setup the inference server?
### 2. Call your inference server from a python script
Open a terminal and run the [phosphobot server.](/installation)
```bash theme={null}
phosphobot run
```
Then, create a new python file called `inference.py`. Inside, copy the content of an example script below.
### Example script for ACT
```python theme={null}
# pip install --upgrade phosphobot
PHOSPHOBOT_API_URL = "http://localhost:80"
allcameras = AllCameras()
time.sleep(1) # Camera warmup
# Connect to ACT server
model = ACT()
while True:
# Capture multi-camera frames (adjust camera IDs and size as needed)
images = [allcameras.get_rgb_frame(0, resize=(240, 320))]
# Get current robot state
state = httpx.post(f"{PHOSPHOBOT_API_URL}/joints/read").json()
# Generate actions
actions = model(
{"state": np.array(state["angles"]), "images": np.array(images)}
)
# Execute actions at 30Hz
for action in actions:
httpx.post(
f"{PHOSPHOBOT_API_URL}/joints/write", json={"angles": action[0].tolist()}
)
time.sleep(1 / 30)
```
### Example script for Pi0.5
```python theme={null}
#pip install --upgrade phosphobot
from phosphobot.camera import AllCameras
import httpx
from phosphobot.am import Pi0
import time
import numpy as np
# Connect to the phosphobot server
PHOSPHOBOT_API_URL = "http://localhost:80"
# Get a camera frame
allcameras = AllCameras()
# Need to wait for the cameras to initialize
time.sleep(1)
# Instantiate the model
model = Pi0(server_url="YOUR_SERVER_URL")
while True:
# Get the frames from the cameras
# We will use this model: PLB/pi0-so100-orangelegobrick-wristcam
# It requires 2 cameras (a context cam and a wrist cam)
images = [
allcameras.get_rgb_frame(camera_id=0, resize=(240, 320)),
allcameras.get_rgb_frame(camera_id=1, resize=(240, 320)),
]
# Get the robot state
state = httpx.post(f"{PHOSPHOBOT_API_URL}/joints/read").json()
inputs = {
"state": np.array(state["angles_rad"]),
"images": np.array(images),
"prompt": "Pick up the orange brick",
}
# Go through the model
actions = model(inputs)
for action in actions:
# Send the new joint postion to the robot
httpx.post(
f"{PHOSPHOBOT_API_URL}/joints/write", json={"angles": action.tolist()}
)
# Wait to respect frequency control (30 Hz)
time.sleep(1 / 30)
```
### Example script for gr00t-n1
You need to install the `torch` and `zmq` libraries.
```bash theme={null}
pip install torch zmq
```
You also need to run a GPU with the gr00t model and inference server. [Use this repo](https://github.com/phospho-app/Isaac-GR00T) to run the server.
```python theme={null}
# pip install --upgrade phosphobot
# /// script
# requires-python = ">=3.10"
# dependencies = [
# "cv2",
# "phosphobot",
# "torch",
# "zmq",
# ]
# ///
import time
import cv2
import numpy as np
from phosphobot.am import Gr00tN1
import httpx
from phosphobot.camera import AllCameras
host = "YOUR_SERVER_IP" # Change this to your server IP (this is the IP of the machine running the Gr00tN1 server using a GPU)
port = 5555
# Change this with your task description
TASK_DESCRIPTION = (
"Pick up the green lego brick from the table and put it in the black container."
)
# Connect to the phosphobot server, this is different from the server IP above
PHOSPHOBOT_API_URL = "http://localhost:80"
allcameras = AllCameras()
time.sleep(1) # Wait for the cameras to initialize
while True:
images = [
allcameras.get_rgb_frame(camera_id=0, resize=(320, 240)),
allcameras.get_rgb_frame(camera_id=1, resize=(320, 240)),
]
for i in range(0, len(images)):
image = images[i]
if image is None:
print(f"Camera {i} is not available.")
continue
image = cv2.cvtColor(image, cv2.COLOR_RGB2BGR)
# Add a batch dimension (from (240, 320, 3) to (1, 240, 320, 3))
converted_array = np.expand_dims(image, axis=0)
converted_array = converted_array.astype(np.uint8)
images[i] = converted_array
# Create the model, you might need to change the action keys based on your model, these can be found in the experiment_cfg/metadata.json file of your Gr00tN1 model
model = Gr00tN1(server_url=host, server_port=port)
response = httpx.post(f"{PHOSPHOBOT_API_URL}/joints/read").json()
state = response["angles_rad"]
# Take a look at the experiment_cfg/metadata.json file in your Gr00t model and check the names of the images, states, and observations
# You may need to adapt the obs JSON to match these names
# The following JSON should work for one arm and 2 video cameras
obs = {
"video.image_cam_0": images[0],
"video.image_cam_1": images[1],
"state.arm": state[0:6].reshape(1, 6),
"annotation.human.action.task_description": [TASK_DESCRIPTION],
}
action = model.sample_actions(obs)
for i in range(0, action.shape[0]):
httpx.post(
f"{PHOSPHOBOT_API_URL}/joints/write", json={"angles": action[i].tolist()}
)
# Wait to respect frequency control (30 Hz)
time.sleep(1 / 30)
```
### Other models
You can implement the `ActionModel` class with your own logic [here](https://github.com/phospho-app/phosphobot/blob/main/phosphobot/am/models.py).
For more information, check out the implementation [here](https://github.com/phospho-app/phosphobot/blob/main/phosphobot/am/models.py).
To run the script, install the phosphobot python module. Then, run the script.
```bash theme={null}
pip install phosphobot
python your_script.py
```
## What's next?
Join the Discord to ask questions, get help from others and get updates (we
ship almost daily)
Learn more about Robotics AI models
5. In the **Model ID**, enter the name of your model on Hugging Face (example: `phospho-app/YOUR_DATASET_NAME-A_RANDOM_ID`). Double check the camera angles so that they match the ones you used to record the dataset.
6. Click on **Start AI Control**. Please wait: the first time, starting a GPU instance and loading the model can take up to 60 seconds. Then the robot will start moving.
You can pause, resume, and stop the AI control at any time by clicking on the control buttons.
If your model supports it, you can edit the **Instruction** field to change the instruction and run it again to see how the robot reacts.
Join the Discord to ask questions and share your demos!
## How to control your robot with an AI model from a python script?
If you're using a different model or want more fine-grained control, you can use the `phosphobot` python module to control your robot with an AI model.
### 1. Setup an inference server
First, you need to setup an inference server. This server runs on a beefy machine with a GPU that can run the AI model. It can be your own machine, a cloud server, or a dedicated server.
If you choose a remote location, chose the closest location to minimize
latency.
To setup the inference server, follow the instructions in the link below:
How to setup the inference server?
### 2. Call your inference server from a python script
Open a terminal and run the [phosphobot server.](/installation)
```bash theme={null}
phosphobot run
```
Then, create a new python file called `inference.py`. Inside, copy the content of an example script below.
### Example script for ACT
```python theme={null}
# pip install --upgrade phosphobot
PHOSPHOBOT_API_URL = "http://localhost:80"
allcameras = AllCameras()
time.sleep(1) # Camera warmup
# Connect to ACT server
model = ACT()
while True:
# Capture multi-camera frames (adjust camera IDs and size as needed)
images = [allcameras.get_rgb_frame(0, resize=(240, 320))]
# Get current robot state
state = httpx.post(f"{PHOSPHOBOT_API_URL}/joints/read").json()
# Generate actions
actions = model(
{"state": np.array(state["angles"]), "images": np.array(images)}
)
# Execute actions at 30Hz
for action in actions:
httpx.post(
f"{PHOSPHOBOT_API_URL}/joints/write", json={"angles": action[0].tolist()}
)
time.sleep(1 / 30)
```
### Example script for Pi0.5
```python theme={null}
#pip install --upgrade phosphobot
from phosphobot.camera import AllCameras
import httpx
from phosphobot.am import Pi0
import time
import numpy as np
# Connect to the phosphobot server
PHOSPHOBOT_API_URL = "http://localhost:80"
# Get a camera frame
allcameras = AllCameras()
# Need to wait for the cameras to initialize
time.sleep(1)
# Instantiate the model
model = Pi0(server_url="YOUR_SERVER_URL")
while True:
# Get the frames from the cameras
# We will use this model: PLB/pi0-so100-orangelegobrick-wristcam
# It requires 2 cameras (a context cam and a wrist cam)
images = [
allcameras.get_rgb_frame(camera_id=0, resize=(240, 320)),
allcameras.get_rgb_frame(camera_id=1, resize=(240, 320)),
]
# Get the robot state
state = httpx.post(f"{PHOSPHOBOT_API_URL}/joints/read").json()
inputs = {
"state": np.array(state["angles_rad"]),
"images": np.array(images),
"prompt": "Pick up the orange brick",
}
# Go through the model
actions = model(inputs)
for action in actions:
# Send the new joint postion to the robot
httpx.post(
f"{PHOSPHOBOT_API_URL}/joints/write", json={"angles": action.tolist()}
)
# Wait to respect frequency control (30 Hz)
time.sleep(1 / 30)
```
### Example script for gr00t-n1
You need to install the `torch` and `zmq` libraries.
```bash theme={null}
pip install torch zmq
```
You also need to run a GPU with the gr00t model and inference server. [Use this repo](https://github.com/phospho-app/Isaac-GR00T) to run the server.
```python theme={null}
# pip install --upgrade phosphobot
# /// script
# requires-python = ">=3.10"
# dependencies = [
# "cv2",
# "phosphobot",
# "torch",
# "zmq",
# ]
# ///
import time
import cv2
import numpy as np
from phosphobot.am import Gr00tN1
import httpx
from phosphobot.camera import AllCameras
host = "YOUR_SERVER_IP" # Change this to your server IP (this is the IP of the machine running the Gr00tN1 server using a GPU)
port = 5555
# Change this with your task description
TASK_DESCRIPTION = (
"Pick up the green lego brick from the table and put it in the black container."
)
# Connect to the phosphobot server, this is different from the server IP above
PHOSPHOBOT_API_URL = "http://localhost:80"
allcameras = AllCameras()
time.sleep(1) # Wait for the cameras to initialize
while True:
images = [
allcameras.get_rgb_frame(camera_id=0, resize=(320, 240)),
allcameras.get_rgb_frame(camera_id=1, resize=(320, 240)),
]
for i in range(0, len(images)):
image = images[i]
if image is None:
print(f"Camera {i} is not available.")
continue
image = cv2.cvtColor(image, cv2.COLOR_RGB2BGR)
# Add a batch dimension (from (240, 320, 3) to (1, 240, 320, 3))
converted_array = np.expand_dims(image, axis=0)
converted_array = converted_array.astype(np.uint8)
images[i] = converted_array
# Create the model, you might need to change the action keys based on your model, these can be found in the experiment_cfg/metadata.json file of your Gr00tN1 model
model = Gr00tN1(server_url=host, server_port=port)
response = httpx.post(f"{PHOSPHOBOT_API_URL}/joints/read").json()
state = response["angles_rad"]
# Take a look at the experiment_cfg/metadata.json file in your Gr00t model and check the names of the images, states, and observations
# You may need to adapt the obs JSON to match these names
# The following JSON should work for one arm and 2 video cameras
obs = {
"video.image_cam_0": images[0],
"video.image_cam_1": images[1],
"state.arm": state[0:6].reshape(1, 6),
"annotation.human.action.task_description": [TASK_DESCRIPTION],
}
action = model.sample_actions(obs)
for i in range(0, action.shape[0]):
httpx.post(
f"{PHOSPHOBOT_API_URL}/joints/write", json={"angles": action[i].tolist()}
)
# Wait to respect frequency control (30 Hz)
time.sleep(1 / 30)
```
### Other models
You can implement the `ActionModel` class with your own logic [here](https://github.com/phospho-app/phosphobot/blob/main/phosphobot/am/models.py).
For more information, check out the implementation [here](https://github.com/phospho-app/phosphobot/blob/main/phosphobot/am/models.py).
To run the script, install the phosphobot python module. Then, run the script.
```bash theme={null}
pip install phosphobot
python your_script.py
```
## What's next?
Join the Discord to ask questions, get help from others and get updates (we
ship almost daily)
Learn more about Robotics AI models