> ## Documentation Index
> Fetch the complete documentation index at: https://docs.phospho.ai/llms.txt
> Use this file to discover all available pages before exploring further.
# VR Control with a Meta Quest
> How to control your robot arm using a Meta Quest 2, Pro, 3, 3s over a local WiFi network
Control your robot arm using a Meta Quest 2, Pro, 3, or 3s. VR control makes bimanual control more intuitive and lets you collect data faster.
Unlock access to VR Control, advanced AI training, and more.
Get the phospho teleoperation app on the Meta Store for Meta Quest 2, Pro, 3, and 3s.
If you bought our [phospho starter pack](https://robots.phospho.ai/starter-pack), you should have received a link to get the phospho teleoperation Meta Quest app. Please [reach out](mailto:contact@phospho.ai) if not.
## Prerequisites
1. You need a robot arm such as the SO-100, the SO-101, or [other compatible hardware](https://github.com/phospho-app/phosphobot). Get the [phosphot starter pack here](https://robots.phospho.ai).
2. Install [the phosphobot software](/installation) on your computer.
```bash macOS theme={null}
curl -fsSL https://raw.githubusercontent.com/phospho-app/phosphobot/main/install.sh | bash
```
```bash Linux theme={null}
curl -fsSL https://raw.githubusercontent.com/phospho-app/phosphobot/main/install.sh | sudo bash
```
```powershell Windows theme={null}
powershell -ExecutionPolicy ByPass -Command "irm https://raw.githubusercontent.com/phospho-app/phosphobot/main/install.ps1 | iex"
```
```bash uv (Linux and macOS) theme={null}
# Install uv: https://docs.astral.sh/uv/
curl -LsSf https://astral.sh/uv/install.sh | sh
# Run phosphobot
uvx phosphobot@latest run
```
```powershell uv (Windows) theme={null}
# Install uv: https://docs.astral.sh/uv/
powershell -ExecutionPolicy ByPass -c "irm https://astral.sh/uv/install.ps1 | iex"
# Run phosphobot
uvx phosphobot@latest run
```
3. Connect robots to your computer. Start the phosphobot server.
```bash theme={null}
phosphobot run
```
4. Complete the [quickstart](/so-100/quickstart) and check that you can [control your robot](/basic-usage/teleop).
5. The **[phosphobot teleoperation app](/examples/teleop)** is installed on your **Meta Quest 2, Pro, 3 or 3s**. >
Unlock access to VR Control, advanced AI training, and more.
Get the phospho teleoperation app on the Meta Store for Meta Quest 2, Pro, 3, and 3s.
If you bought our [phospho starter pack](https://robots.phospho.ai/starter-pack), you should have received a link to get the phospho teleoperation Meta Quest app. Please [reach out](mailto:contact@phospho.ai) if not.
## How to control your robot arm with the Meta Quest app? Step by step instructions
The phospho teleoperation app works with a [Meta Quest](https://www.meta.com/fr/quest/quest-3/?srsltid=AfmBOorMLUmJKFQr35ssCi1DDqSNgpHk0sLHqo_tHG8kgclCYbMToAPa). Compatible models: Pro, 2, 3, 3s.
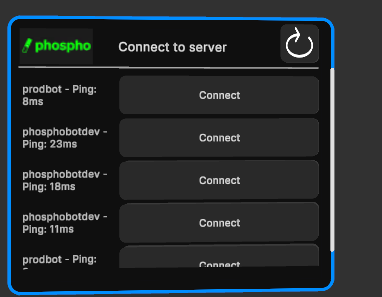
1. In the Meta Quest, open the phospho teleop application. Wait a moment, then you should see a row displaying **phosphobot** or your computer name. Click the **Connect** button using the `Trigger Button`.
Make sure you're connected to the same WiFi as the phosphobot server or the control moduleIf you don't see the server, check the IP address and port of the server in the phosphobot dashboard and enter it manually.
2. After connecting, you'll see the list of connected cameras and recording options.
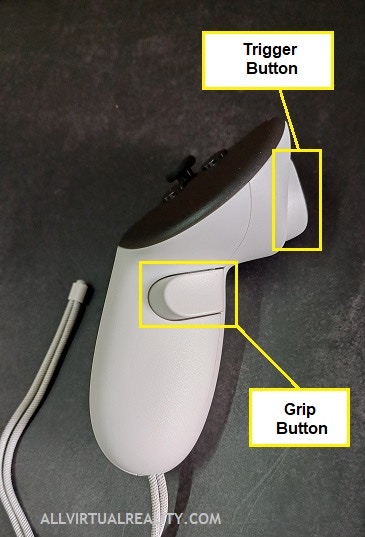
* Move the windows with the `Grip button` to organize your space.
* Enable preview to see the camera feed. Check the **camera angles** and adjust their positions if needed.
We recommend **disabling** the camera preview to save bandwidth.
3. Press `A` once to start teleoperation and begin moving your controller.
* The robot will naturally follow the movement of your controller. Press the `Trigger button` to close the gripper.
* Press `A` again to stop the teleoperation. The robot will stop.
4. Press `B` to start recording. You can leave the default settings for your first attempt.
* Press `B` again to stop the recording.
* Press `Y` (left controller) to discard the recording.
5. Continue teleoperating and stop the recording by pressing `B` when you're done.
6. The recording is automatically saved in **LeRobot v2** format and **uploaded to your HuggingFace account.**
## Examples of VR control
The phospho Meta Quest app lets you operate the robot arm in real time. With the built-in stereo camera system, you can see the robot's environment in 3D, allowing you to interact as if you were physically present.
## What's next?
Use your **recorded datasets** to **train AI models**.
Follow this guide to teleoperate the robot arm and train your first AI model.
 2. After connecting, you'll see the list of connected cameras and recording options.
* Move the windows with the `Grip button` to organize your space.
* Enable preview to see the camera feed. Check the **camera angles** and adjust their positions if needed.
2. After connecting, you'll see the list of connected cameras and recording options.
* Move the windows with the `Grip button` to organize your space.
* Enable preview to see the camera feed. Check the **camera angles** and adjust their positions if needed.
 3. Press `A` once to start teleoperation and begin moving your controller.
* The robot will naturally follow the movement of your controller. Press the `Trigger button` to close the gripper.
* Press `A` again to stop the teleoperation. The robot will stop.
4. Press `B` to start recording. You can leave the default settings for your first attempt.
* Press `B` again to stop the recording.
* Press `Y` (left controller) to discard the recording.
5. Continue teleoperating and stop the recording by pressing `B` when you're done.
6. The recording is automatically saved in **LeRobot v2** format and **uploaded to your HuggingFace account.**
## Examples of VR control
The phospho Meta Quest app lets you operate the robot arm in real time. With the built-in stereo camera system, you can see the robot's environment in 3D, allowing you to interact as if you were physically present.
## What's next?
Use your **recorded datasets** to **train AI models**.
3. Press `A` once to start teleoperation and begin moving your controller.
* The robot will naturally follow the movement of your controller. Press the `Trigger button` to close the gripper.
* Press `A` again to stop the teleoperation. The robot will stop.
4. Press `B` to start recording. You can leave the default settings for your first attempt.
* Press `B` again to stop the recording.
* Press `Y` (left controller) to discard the recording.
5. Continue teleoperating and stop the recording by pressing `B` when you're done.
6. The recording is automatically saved in **LeRobot v2** format and **uploaded to your HuggingFace account.**
## Examples of VR control
The phospho Meta Quest app lets you operate the robot arm in real time. With the built-in stereo camera system, you can see the robot's environment in 3D, allowing you to interact as if you were physically present.
## What's next?
Use your **recorded datasets** to **train AI models**.