> ## Documentation Index
> Fetch the complete documentation index at: https://docs.phospho.ai/llms.txt
> Use this file to discover all available pages before exploring further.
# Install phosphobot
> Control your robot arm in seconds with phosphobot on any computer
## Install phosphobot
The quickest way to get started is to use the install script and a compiled version. In a terminal, run the following command:
```bash macOS theme={null}
curl -fsSL https://raw.githubusercontent.com/phospho-app/phosphobot/main/install.sh | bash
```
```bash Linux theme={null}
curl -fsSL https://raw.githubusercontent.com/phospho-app/phosphobot/main/install.sh | sudo bash
```
```powershell Windows theme={null}
powershell -ExecutionPolicy ByPass -Command "irm https://raw.githubusercontent.com/phospho-app/phosphobot/main/install.ps1 | iex"
```
```bash uv (Linux and macOS) theme={null}
# Install uv: https://docs.astral.sh/uv/
curl -LsSf https://astral.sh/uv/install.sh | sh
# Run phosphobot
uvx phosphobot@latest run
```
```powershell uv (Windows) theme={null}
# Install uv: https://docs.astral.sh/uv/
powershell -ExecutionPolicy ByPass -c "irm https://astral.sh/uv/install.ps1 | iex"
# Run phosphobot
uvx phosphobot@latest run
```
Then, run the phosphobot server:
```bash theme={null}
phosphobot run
```
It can take up to 15 seconds for the server to start.
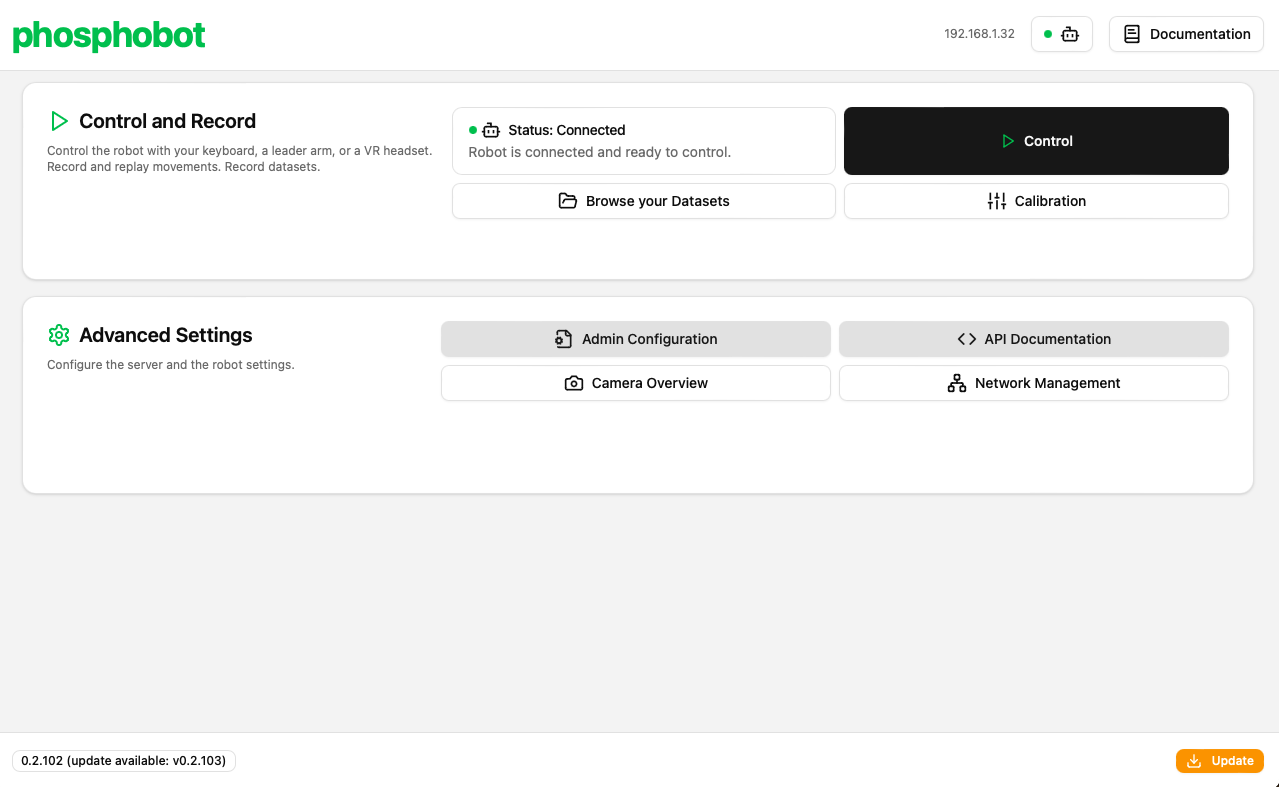
On the same computer, open a web browser and navigate to `localhost`. You should now see the **phosphobot dashboard**.
Discover how to control your robot arm from the dashboard and from the Meta Quest app.
## Using uv (pip)
phosphobot is also available as a [Python package.](https://pypi.org/project/phosphobot/) We recommend using [uv](https://docs.astral.sh/uv/getting-started/installation/) to install it.
1. Install uv by running the following command in your terminal:
```bash macOS and Linux theme={null}
curl -LsSf https://astral.sh/uv/install.sh | sh
```
```powershell Windows theme={null}
powershell -ExecutionPolicy ByPass -c "irm https://astral.sh/uv/install.ps1 | iex"
```
2. Run phosphobot with uv by running the following command in your terminal:
```bash theme={null}
uvx phosphobot@latest run
```
Using the `@latest` tag ensures you always run the latest version of phosphobot.
If you want to run a specific version, [you can specify it:](https://docs.astral.sh/uv/guides/tools/#requesting-specific-versions)
```bash theme={null}
uvx phosphobot>=0.30 run
```
Check the [uv doc](https://docs.astral.sh/uv/guides/tools/#upgrading-tools) on how to manually handle updates.
### Troubleshooting
Depending on your system, you may encouter errors related to **pybullet** compilation. If so, please refer [to this guide](https://github.com/phospho-app/phosphobot/tree/main/phosphobot#troubleshooting-pybullet-wont-build-on-windows) that list some common issues and how to fix them..
## MacOS (brew)
On MacOS, use [Homebrew](https://brew.sh/) to install phosphobot:
```bash theme={null}
brew tap phospho-app/phosphobot
brew install phosphobot
```
To **update phosphobot**, run the following command:
```bash theme={null}
brew update && brew upgrade phosphobot
```
You can also [directly download the binaries here.](https://github.com/phospho-app/homebrew-phosphobot/releases/latest)
## Linux (apt)
On Linux, we use apt to distribute phosphobot and you need additional packages. That's why you need to run the install script with sudo:
```bash theme={null}
curl -fsSL https://raw.githubusercontent.com/phospho-app/phosphobot/main/install.sh | sudo bash
```
To **update phosphobot**, run the following command:
```bash theme={null}
sudo apt update && sudo apt install --only-upgrade phosphobot
```
## Raspberry Pi (apt)
phosphobot on Raspberry Pi has advanced features to make it easier to use (led ticking, bluetooth connection, WiFi hotspot, extra dependencies already installed).
*If you already have a setup Raspberry Pi, you can skip this part*
Download and install the [Raspberry Pi imager](https://www.raspberrypi.com/software/) on your main computer.
Insert an **SD card** into your main computer.
Run the Raspberry Pi imager.
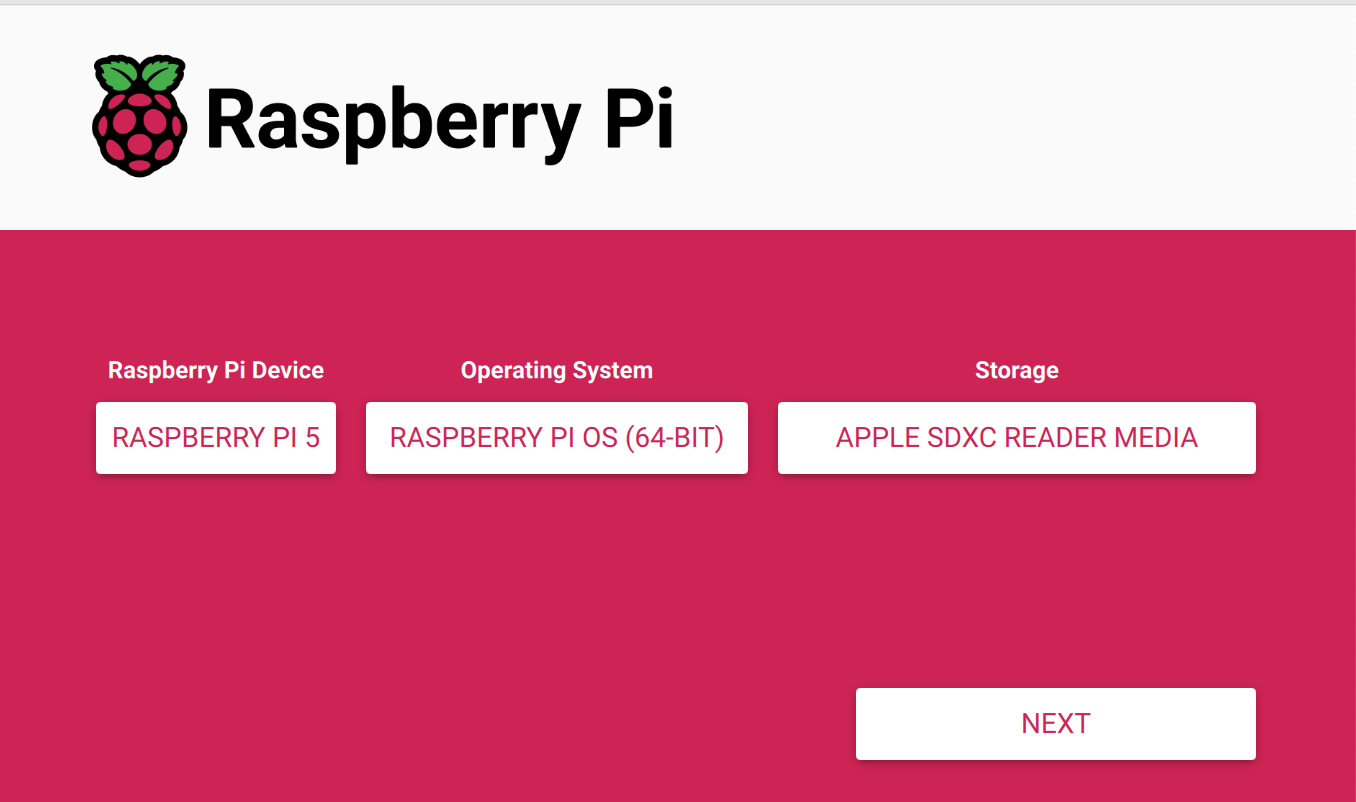
* Select your Raspberry Pi model (the version in the dev kit is Raspberry Pi 5).
* Select the Raspberry Pi OS (64 bit)?
* Select your SD card?
Then, click **Next** on the bottom right.
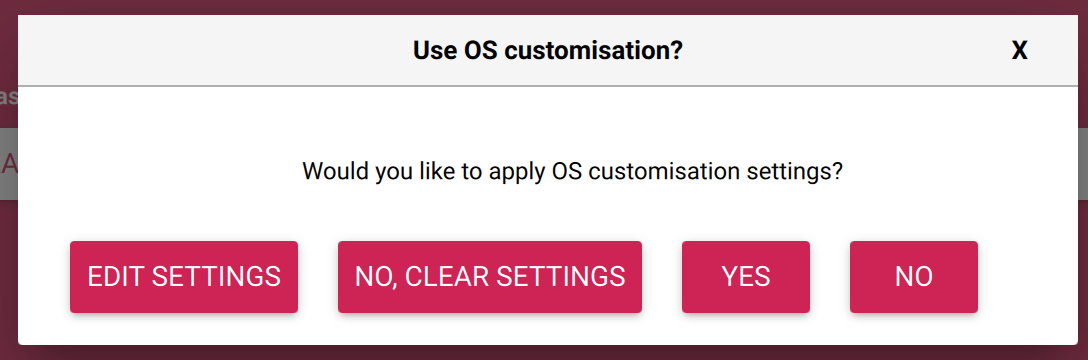
When the window pops up asking for OS customisation, select **Edit Settings**.
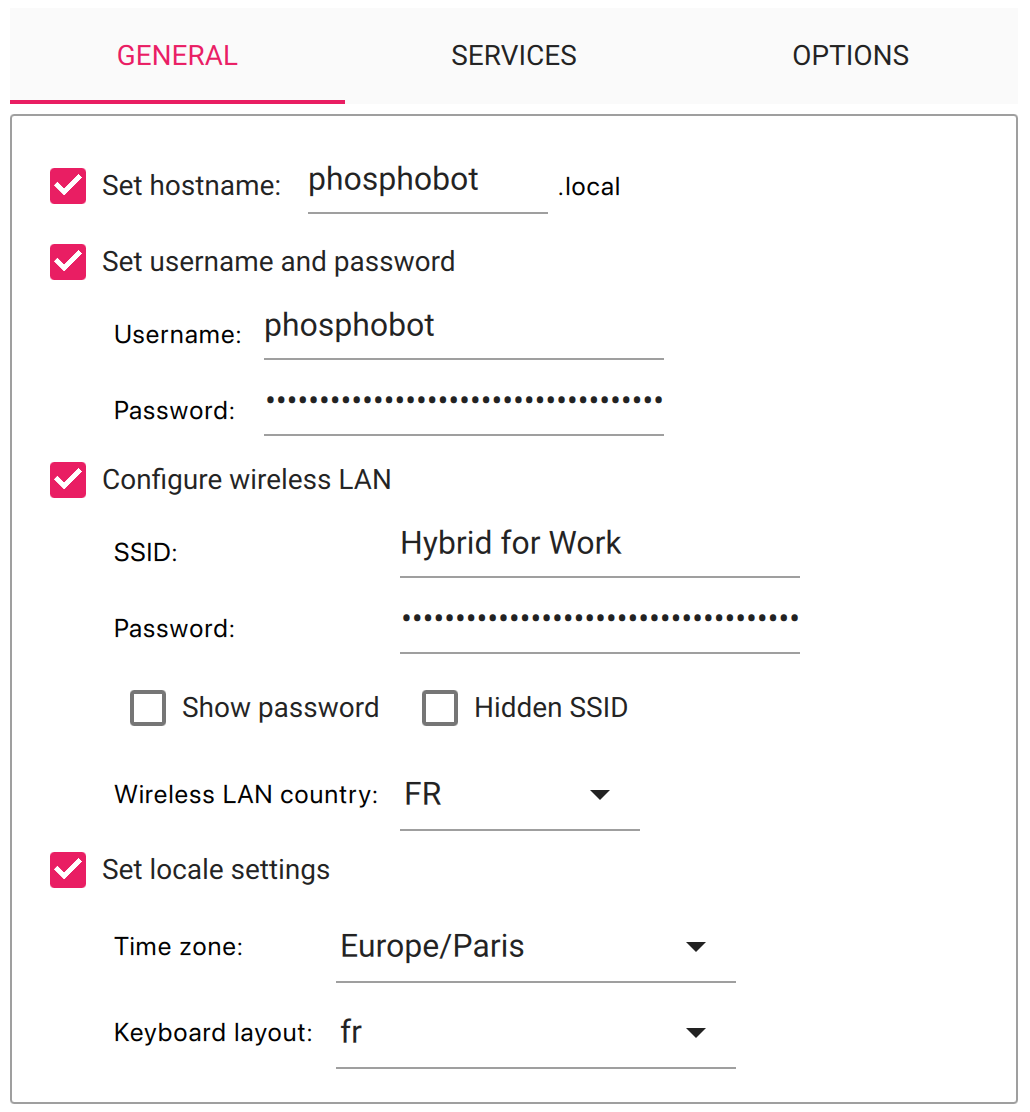
In general settings :
* Set hostname to `phosphobot`?
* Set username and password to `phosphobot` and `password123` (example).
* Configure wireless LAN: add your Wifi network name, password, and country. Be careful: tHiS iS cAsE sEnSiTiVe!
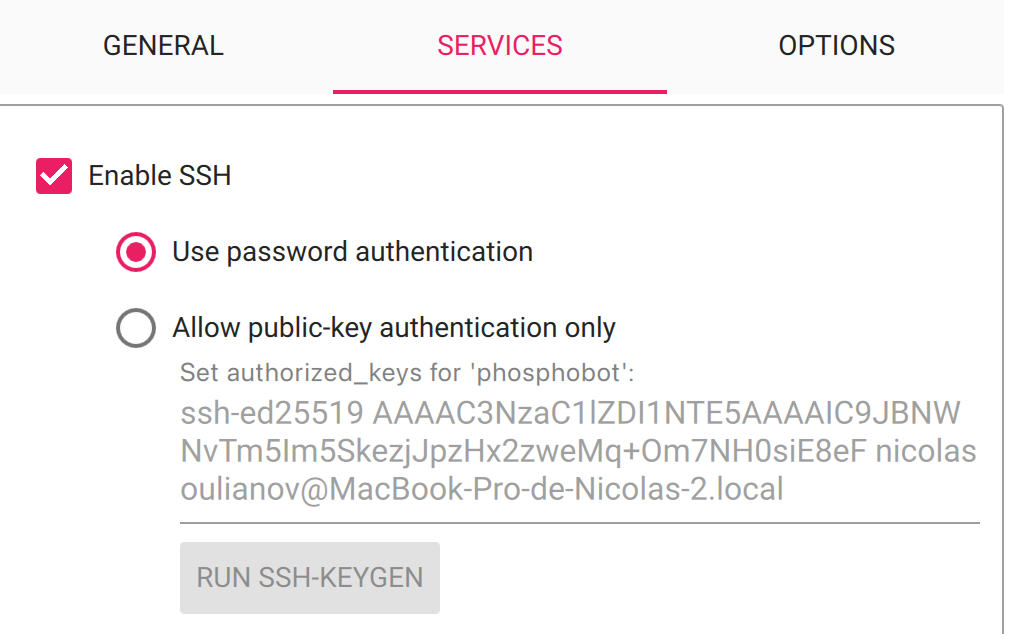
In the Services settings, make sure SSH is enabled.
Then hit Save and hit Yes to use the OS customization settings. Write the image to the SD card.
When writing is finished, take out the SD card from your computer.
Insert the microSD into the Raspberry Pi when it's turned off.
**1. SSH into the Raspberry Pi**
SSH (Secure Shell) allows you to access the Raspberry Pi remotely from your main computer through the terminal.
Turn on the Raspberry Pi by plugging it to a power source. Wait for it to boot (look for the LED pattern)
Then, open a terminal and SSH into your Raspberry Pi. If you've followed the previous part, this means running on your computer this command :
```bash theme={null}
ssh phosphobot@phosphobot.local
```
*If you didn't follow the previous part, the [username@hostname.local](mailto:username@hostname.local) and password may be different.*
When asked about the authenticity of host phosphobot.local, type `yes` to accept.
And when asked for password, enter `password123` .
**2. Install the software**
When you've successfully SSH in the Raspberry Pi, run this to install the teleoperation server :
```bash theme={null}
curl -fsSL https://raw.githubusercontent.com/phospho-app/phosphobot/main/install.sh | sudo bash
```
**Your Raspberry Pi should be connected to the internet.**
* When prompted `btberrywifi install location`, **leave blank**.
* When prompted `bluetooth password`, **leave blank**
* When prompted `Enter your country code`, specify your country code (eg: US, FR…)
After that, the installation script will download install dependencies. It can take a few minutes depending on your connection speed.
**3. Once the installation is complete, reboot your Raspberry Pi.**
```bash theme={null}
sudo reboot
```
Every time the control module is powered on, it will check for updates and install them automatically. They will be available the next time you power it on.
## Windows
### Windows (Install script)
1. To **install** or **update** phosphobot, run the following command in PowerShell:
```powershell theme={null}
powershell -ExecutionPolicy Bypass -Command "irm https://raw.githubusercontent.com/phospho-app/phosphobot/main/install.ps1 | iex"
```
2. To start the phosphobot server, run the following command in PowerShell.
```powershell theme={null}
phosphobot run
```
3. When the "Windows protected your PC" warning appears, click **"More info"**, then click **"Run anyway"**.
The warning only appears on first run. Subsequent launches work normally.
### Windows (manual)
You can also [directly download the binaries here.](https://github.com/phospho-app/homebrew-phosphobot/releases/latest). After downloading, run phosphobot this way:
```powershell theme={null}
C:\path\to\phosphobot.exe run
```
Change `C:\path\to\` to the path where you downloaded phosphobot. To make this easier, we recommand you to rename the file to `phosphobot.exe` and move it to your Desktop.
Then, you can **create a shortcut** to launch `C:\Users\\Desktop\phosphobot.exe run` from anywhere.
### Windows (WSL)
You can use the Windows Subsystem for Linux (WSL) to run phosphobot.
1. Please refer to [this guide](https://learn.microsoft.com/en-us/windows/wsl/install) to install WSL on your Windows machine.
2. Use [usbipd](https://github.com/dorssel/usbipd-win) to pass the robot arms and the cameras to WSL.
3. Carry on with the [Linux installation instructions](#linux-apt).
## Install from source
phosphobot is open source and you can install it from source to contribute to the project or fix compatibility issues.
You can find the instructions in the [GitHub repository right here](https://github.com/phospho-app/phosphobot/tree/main/phosphobot)
## Support
Join the Discord to ask questions, get help from others and get updates
 When the window pops up asking for OS customisation, select **Edit Settings**.
 In general settings :
* Set hostname to `phosphobot`?
* Set username and password to `phosphobot` and `password123` (example).
* Configure wireless LAN: add your Wifi network name, password, and country. Be careful: tHiS iS cAsE sEnSiTiVe!
In general settings :
* Set hostname to `phosphobot`?
* Set username and password to `phosphobot` and `password123` (example).
* Configure wireless LAN: add your Wifi network name, password, and country. Be careful: tHiS iS cAsE sEnSiTiVe!
 In the Services settings, make sure SSH is enabled.
 Then hit Save and hit Yes to use the OS customization settings. Write the image to the SD card.
When writing is finished, take out the SD card from your computer.
Insert the microSD into the Raspberry Pi when it's turned off.
Then hit Save and hit Yes to use the OS customization settings. Write the image to the SD card.
When writing is finished, take out the SD card from your computer.
Insert the microSD into the Raspberry Pi when it's turned off.