> ## Documentation Index
> Fetch the complete documentation index at: https://docs.phospho.ai/llms.txt
> Use this file to discover all available pages before exploring further.
# Train robotics AI models
> A guide to training AI models that control robots
The phospho starter pack makes it easy to train robotics AI models by integrating with **LeRobot** from Hugging Face.
In this guide, we'll show you how to train the ACT (Action Chunking Transformer) model using the phospho starter pack and LeRobot by Hugging Face.
## What is LeRobot?

LeRobot is a platform designed to make real-world robotics more accessible for everyone. It provides pre-trained models, datasets, and tools in PyTorch.
It focuses on state-of-the-art approaches in **imitation learning** and **reinforcement learning**.
With LeRobot, you get access to:
* Pretrained models for robotics applications
* Human-collected demonstration datasets
* Simulated environments to test and refine AI models
Useful links:
* [LeRobot on GitHub](https://github.com/huggingface/lerobot)
* [LeRobot on Hugging Face](https://huggingface.co/lerobot)
* [AI models for robotics](https://huggingface.co/models?pipeline_tag=robotics\&sort=trending)
## Step by step guide
In this guide, we will use the phospho starter pack to record a dataset and upload it to Hugging Face.
## Prerequisites
1. You need an assembled **SO-100** robot arm and **cameras**. Get the [phosphot starter pack here](https://robots.phospho.ai).
2. Install [the phosphobot software](/installation)
```bash macOS theme={null}
curl -fsSL https://raw.githubusercontent.com/phospho-app/phosphobot/main/install.sh | bash
```
```bash Linux theme={null}
curl -fsSL https://raw.githubusercontent.com/phospho-app/phosphobot/main/install.sh | sudo bash
```
```powershell Windows theme={null}
powershell -ExecutionPolicy ByPass -Command "irm https://raw.githubusercontent.com/phospho-app/phosphobot/main/install.ps1 | iex"
```
```bash uv (Linux and macOS) theme={null}
# Install uv: https://docs.astral.sh/uv/
curl -LsSf https://astral.sh/uv/install.sh | sh
# Run phosphobot
uvx phosphobot@latest run
```
```powershell uv (Windows) theme={null}
# Install uv: https://docs.astral.sh/uv/
powershell -ExecutionPolicy ByPass -c "irm https://astral.sh/uv/install.ps1 | iex"
# Run phosphobot
uvx phosphobot@latest run
```
3. **Connect your cameras to the computer.** Start the phosphobot server.
```bash theme={null}
phosphobot run
```
4. Complete the [quickstart](/so-100/quickstart) and check that you can [control your robot](/basic-usage/teleop).
5. You have the **[phosphobot teleoperation app](/examples/teleop)** is installed on your **Meta Quest 2, Pro, 3 or 3s**
Unlock access to VR Control, advanced AI training, and more.
Get the phospho teleoperation app on the Meta Store for Meta Quest 2, Pro, 3, and 3s.
If you bought our [phospho starter pack](https://robots.phospho.ai/starter-pack), you should have received a link to get the phospho teleoperation Meta Quest app. Please [reach out](mailto:contact@phospho.ai) if not.
6. You have a **device to train your model**. We recommend using a **GPU** for faster training.
## 1. Set up your Hugging Face token
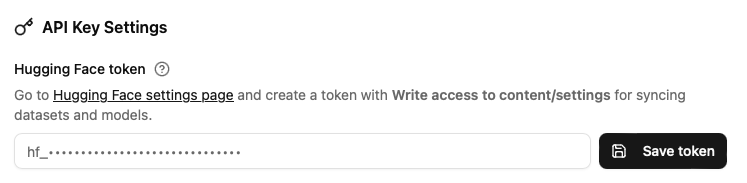
To sync datasets, you need a Hugging Face token with write access. Follow these steps to generate one:
1. Log in to your Hugging Face account. You can create [one here for free](https://huggingface.co)
2. Go to **Profile** and click **Access Tokens** in the sidebar.
3. Select the **Write** option to grant write access to your account. This is necessary for creating new datasets and uploading files. Name your token and click **Create token**.
4. **Copy the token** and **save it** in a secure place. You will need it later.
5. Make sure the phosphobot server is running. Open a browser and access `localhost` or `phosphobot.local` if you're using the control module. Then go to the Admin Configuration.
6. **Paste the Hugging Face token**, and **save it**.
## 2. Set your dataset name and parameters
Go to the *Admin Configuration* page of your phospshobot dashboard. You can adjust settings. The most important are:
* **Dataset Name**: The name of the dataset you want to record.
* **Task**: A text description of the task you're about to record. For example: *"Pick up the lego brick and put it in the box"*. This helps you remember what you recorded and is used by some AI models to understand the task.
* **Camera**: The cameras you want to record. By default, all cameras are recorded. You can select the cameras to record in the Admin Configuration.
* **Video Codec**: The video codec used to record the videos. The default is `AVC1`, which is the most efficient codec. If you're having compatibility issues due to unavailable codecs (eg on Linux), switch to `mp4v` which is more compatible.
## 3. Control the robot in the Meta Quest app
The easiest way to record a dataset is to use the Meta Quest app.
Unlock access to VR Control, advanced AI training, and more.
Get the phospho teleoperation app on the Meta Store for Meta Quest 2, Pro, 3, and 3s.
If you bought our [phospho starter pack](https://robots.phospho.ai/starter-pack), you should have received a link to get the phospho teleoperation Meta Quest app. Please [reach out](mailto:contact@phospho.ai) if not.The phospho teleoperation app works with a [Meta Quest](https://www.meta.com/fr/quest/quest-3/?srsltid=AfmBOorMLUmJKFQr35ssCi1DDqSNgpHk0sLHqo_tHG8kgclCYbMToAPa). Compatible models: Pro, 2, 3, 3s.
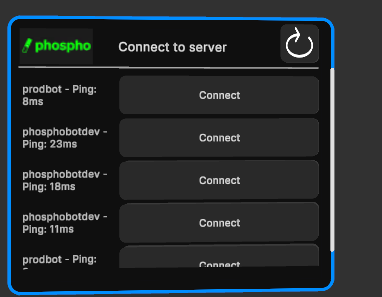
1. In the Meta Quest, open the phospho teleop application. Wait a moment, then you should see a row displaying **phosphobot** or your computer name. Click the **Connect** button using the `Trigger Button`.
Make sure you're connected to the same WiFi as the phosphobot server or the control moduleIf you don't see the server, check the IP address and port of the server in the phosphobot dashboard and enter it manually.
2. After connecting, you'll see the list of connected cameras and recording options.
* Move the windows with the `Grip button` to organize your space.
* Enable preview to see the camera feed. Check the **camera angles** and adjust their positions if needed.
We recommend **disabling** the camera preview to save bandwidth.
3. Press `A` once to start teleoperation and begin moving your controller.
* The robot will naturally follow the movement of your controller. Press the `Trigger button` to close the gripper.
* Press `A` again to stop the teleoperation. The robot will stop.
4. Press `B` to start recording. You can leave the default settings for your first attempt.
* Press `B` again to stop the recording.
* Press `Y` (left controller) to discard the recording.
5. Continue teleoperating and stop the recording by pressing `B` when you're done.
6. The recording is automatically saved in **LeRobot v2** format and **uploaded to your HuggingFace account.**
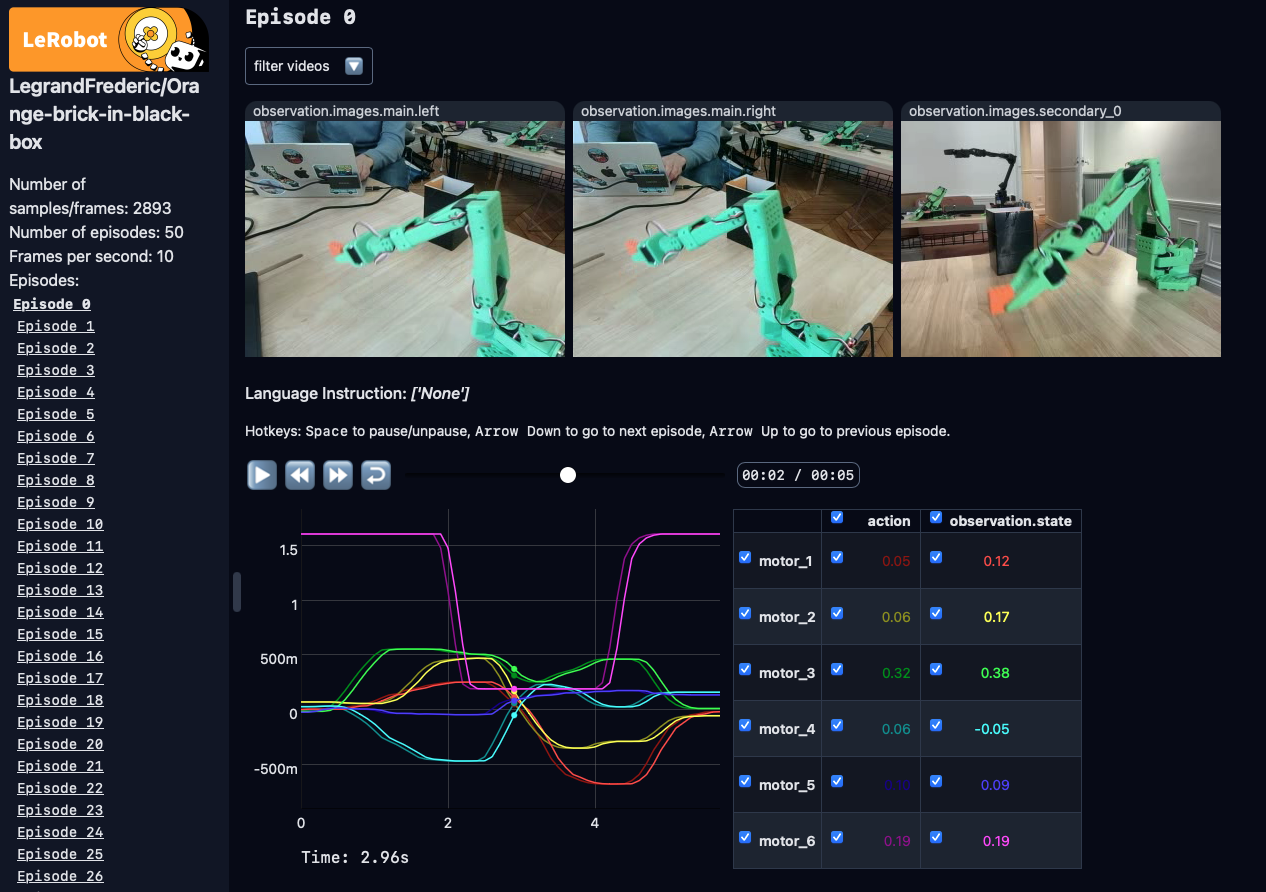
Go to the **Dataset tab** in the phosphobot dashboard to see the recorded dataset. Use the button Preview to preview them using [LeRobot Dataset Visualizer](https://huggingface.co/spaces/lerobot/visualize_dataset).
The dataset visualizer only works with `AVC1` video codec. If you used another
codec, you may see black screens in the video preview. Preview directly the
videos files in a video player by opening your recording locally:
`~/phosphobot/recordings/`.
## 4. Train your first model
### Train GR00T-N1-2B, Pi0.5, ACT, BB\_ACT in one click with phosphobot cloud
To train a model, you can use the phosphobot cloud. This is the quickest way to train a model.
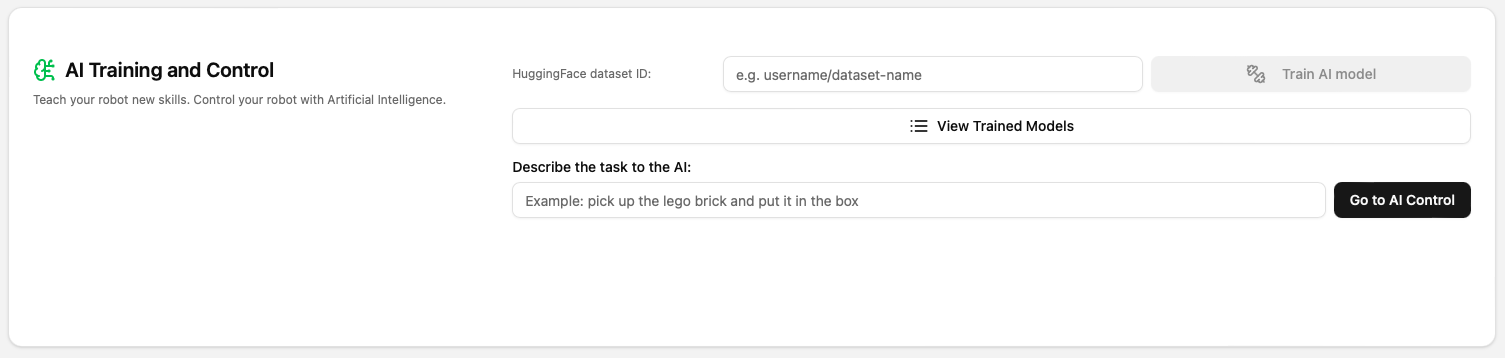
1. Enter the name of your dataset on Hugging Face (example: `PLB/simple-lego-pickup-mono-2`) in the **AI Training and Control** section.
2. Select the parameters you want to change or leave the default ones.
3. Click on **Train AI Model**. Your model starts training. Training can take up to 3 hours. Follow the training using the button **View trained models**. Your model is uploaded to HuggingFace [on the phospho-app account](https://huggingface.co/phospho-app).
4. To control your robot with the trained model, go to the **Control your robot** section and enter the name of your model.
Learn how to train a model with phosphobot cloud
Learn about controlling your robot with GR00T-N1-2B and phosphobot cloud
### Train an ACT model locally with LeRobot
You need a GPU with at least 16GB of memory to train the model.
This guide will show you how to train the ACT model locally using **LeRobot** for your SO-100 robot.
1. Install [uv](https://docs.astral.sh/uv/), the modern Python package manager.
```bash theme={null}
# On macOS and Linux
curl -LsSf https://astral.sh/uv/install.sh | sh
```
2. Set up training environment.
```bash theme={null}
mkdir my_model
cd my_model
uv init
uv add phosphobot git+https://github.com/phospho-app/lerobot
git clone https://github.com/phospho-app/lerobot
```
3. (MacOS only) Set environment variables for torch compatibility:
```bash theme={null}
export DYLD_LIBRARY_PATH="/opt/homebrew/lib:/usr/local/lib:$DYLD_LIBRARY_PATH"
```
4. (Optional) Add the [Weight & Biases](https://wandb.ai) integration for training metrics tracking:
```bash theme={null}
wandb login
```
5. Run training script - Adjust parameters based on your hardware:
```bash theme={null}
uv run lerobot/lerobot/scripts/train.py \
--dataset.repo_id=LegrandFrederic/Orange-brick-in-black-box \ # Replace with /
--policy.type=act \ # Choose from act, diffusion, tdmpc, or vqbet
--output_dir=outputs/train/phoshobot_test \
--job_name=phosphobot_test \
--policy.device=mps \ # Use 'cuda' for NVIDIA GPUs or 'cpu' if no GPU
--wandb.enable=true # Optional
```
Trained models will be saved in `lerobot/outputs/train/`.
6. (Optional) Upload the model to Hugging Face. Login to HuggingFace CLI:
```bash theme={null}
huggingface-cli login
# Enter your write token from https://huggingface.co/settings/tokens
```
HuggingFace model hub is a wrapper of [Github LFS](https://docs.github.com/en/repositories/working-with-files/managing-large-files/about-git-large-file-storage). Push the model to Hugging Face:
```bash theme={null}
# From your training output directory
cd lerobot/outputs/train/phosphobot_test
# Initialize and push to Hub (replace and )
huggingface-cli repo-create / --type model
git lfs install
git add .
git commit -m "Add trained ACT model"
git push
```
## 5. Control your robot with the ACT model
1. Launch ACT inference server (Run on GPU machine):
```bash theme={null}
# Download inference server script
curl -o server.py https://raw.githubusercontent.com/phospho-app/phosphobot/main/inference/ACT/server.py
```
```bash theme={null}
# Start server
uv run server.py --model_id LegrandFrederic/Orange-brick-in-black-box # Replace with
```
2. Make sure the phosphobot server is running to control your robot:
```bash theme={null}
# Install it this way
curl -fsSL https://raw.githubusercontent.com/phospho-app/phosphobot/main/install.sh | bash
# Start it this way
phosphobot run
```
3. Create inference client script (Copy the content into `my_model/client.py`):
```python theme={null}
# /// script
# requires-python = ">=3.10"
# dependencies = [
# "phosphobot",
# ]
#
# ///
# /// script
# requires-python = ">=3.10"
# dependencies = [
# "phosphobot",
# ]
#
# ///
from phosphobot.camera import AllCameras
import httpx
from phosphobot.am import ACT
import time
import numpy as np
# Initialize hardware interfaces
PHOSPHOBOT_API_URL = "http://localhost:80"
allcameras = AllCameras()
time.sleep(1) # Camera warmup
# Connect to ACT server
model = ACT()
while True:
# Capture multi-camera frames (adjust camera IDs and size as needed)
images = [allcameras.get_rgb_frame(0, resize=(240, 320))]
# Get current robot state
state = httpx.post(f"{PHOSPHOBOT_API_URL}/joints/read").json()
# Generate actions
actions = model(
{"state": np.array(state["angles_rad"]), "images": np.array(images)}
)
# Execute actions at 30Hz
for action in actions:
httpx.post(
f"{PHOSPHOBOT_API_URL}/joints/write", json={"angles": action.tolist()}
)
time.sleep(1 / 30)
```
4. Run the inference script:
```bash theme={null}
uv run client.py
```
Stop the script by pressing `Ctrl + C`.
## What's next?
Next, you can use the trained model to control your robot. Head to our [guide](/basic-usage/inference) to get started!
Learn more about Robotics AI models
Join the Discord to ask questions, get help from others and get updates (we
ship almost daily)
 ## 2. Set your dataset name and parameters
Go to the *Admin Configuration* page of your phospshobot dashboard. You can adjust settings. The most important are:
* **Dataset Name**: The name of the dataset you want to record.
* **Task**: A text description of the task you're about to record. For example: *"Pick up the lego brick and put it in the box"*. This helps you remember what you recorded and is used by some AI models to understand the task.
* **Camera**: The cameras you want to record. By default, all cameras are recorded. You can select the cameras to record in the Admin Configuration.
* **Video Codec**: The video codec used to record the videos. The default is `AVC1`, which is the most efficient codec. If you're having compatibility issues due to unavailable codecs (eg on Linux), switch to `mp4v` which is more compatible.
## 3. Control the robot in the Meta Quest app
The easiest way to record a dataset is to use the Meta Quest app.
## 2. Set your dataset name and parameters
Go to the *Admin Configuration* page of your phospshobot dashboard. You can adjust settings. The most important are:
* **Dataset Name**: The name of the dataset you want to record.
* **Task**: A text description of the task you're about to record. For example: *"Pick up the lego brick and put it in the box"*. This helps you remember what you recorded and is used by some AI models to understand the task.
* **Camera**: The cameras you want to record. By default, all cameras are recorded. You can select the cameras to record in the Admin Configuration.
* **Video Codec**: The video codec used to record the videos. The default is `AVC1`, which is the most efficient codec. If you're having compatibility issues due to unavailable codecs (eg on Linux), switch to `mp4v` which is more compatible.
## 3. Control the robot in the Meta Quest app
The easiest way to record a dataset is to use the Meta Quest app.
 2. After connecting, you'll see the list of connected cameras and recording options.
* Move the windows with the `Grip button` to organize your space.
* Enable preview to see the camera feed. Check the **camera angles** and adjust their positions if needed.
2. After connecting, you'll see the list of connected cameras and recording options.
* Move the windows with the `Grip button` to organize your space.
* Enable preview to see the camera feed. Check the **camera angles** and adjust their positions if needed.
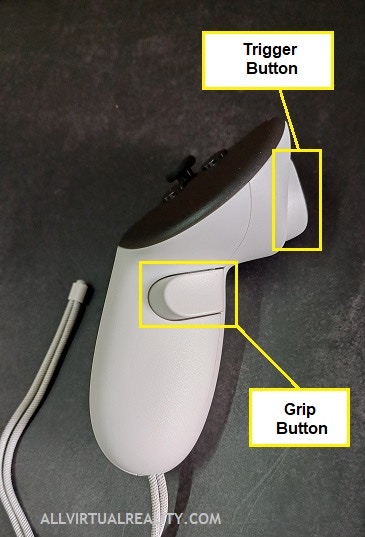 3. Press `A` once to start teleoperation and begin moving your controller.
* The robot will naturally follow the movement of your controller. Press the `Trigger button` to close the gripper.
* Press `A` again to stop the teleoperation. The robot will stop.
4. Press `B` to start recording. You can leave the default settings for your first attempt.
* Press `B` again to stop the recording.
* Press `Y` (left controller) to discard the recording.
5. Continue teleoperating and stop the recording by pressing `B` when you're done.
6. The recording is automatically saved in **LeRobot v2** format and **uploaded to your HuggingFace account.**
Go to the **Dataset tab** in the phosphobot dashboard to see the recorded dataset. Use the button Preview to preview them using [LeRobot Dataset Visualizer](https://huggingface.co/spaces/lerobot/visualize_dataset).
3. Press `A` once to start teleoperation and begin moving your controller.
* The robot will naturally follow the movement of your controller. Press the `Trigger button` to close the gripper.
* Press `A` again to stop the teleoperation. The robot will stop.
4. Press `B` to start recording. You can leave the default settings for your first attempt.
* Press `B` again to stop the recording.
* Press `Y` (left controller) to discard the recording.
5. Continue teleoperating and stop the recording by pressing `B` when you're done.
6. The recording is automatically saved in **LeRobot v2** format and **uploaded to your HuggingFace account.**
Go to the **Dataset tab** in the phosphobot dashboard to see the recorded dataset. Use the button Preview to preview them using [LeRobot Dataset Visualizer](https://huggingface.co/spaces/lerobot/visualize_dataset).