> ## Documentation Index
> Fetch the complete documentation index at: https://docs.phospho.ai/llms.txt
> Use this file to discover all available pages before exploring further.
# Dev kit unboxing (DK1)
> Unbox and set up your phospho dev kit.
In this guide, we will unbox and set up the **first version** of the phospho dev kit (DK1).
We no longer sell these dev kits. If you have the DK2, see the [DK2 unboxing guide](/unboxings/dk2).
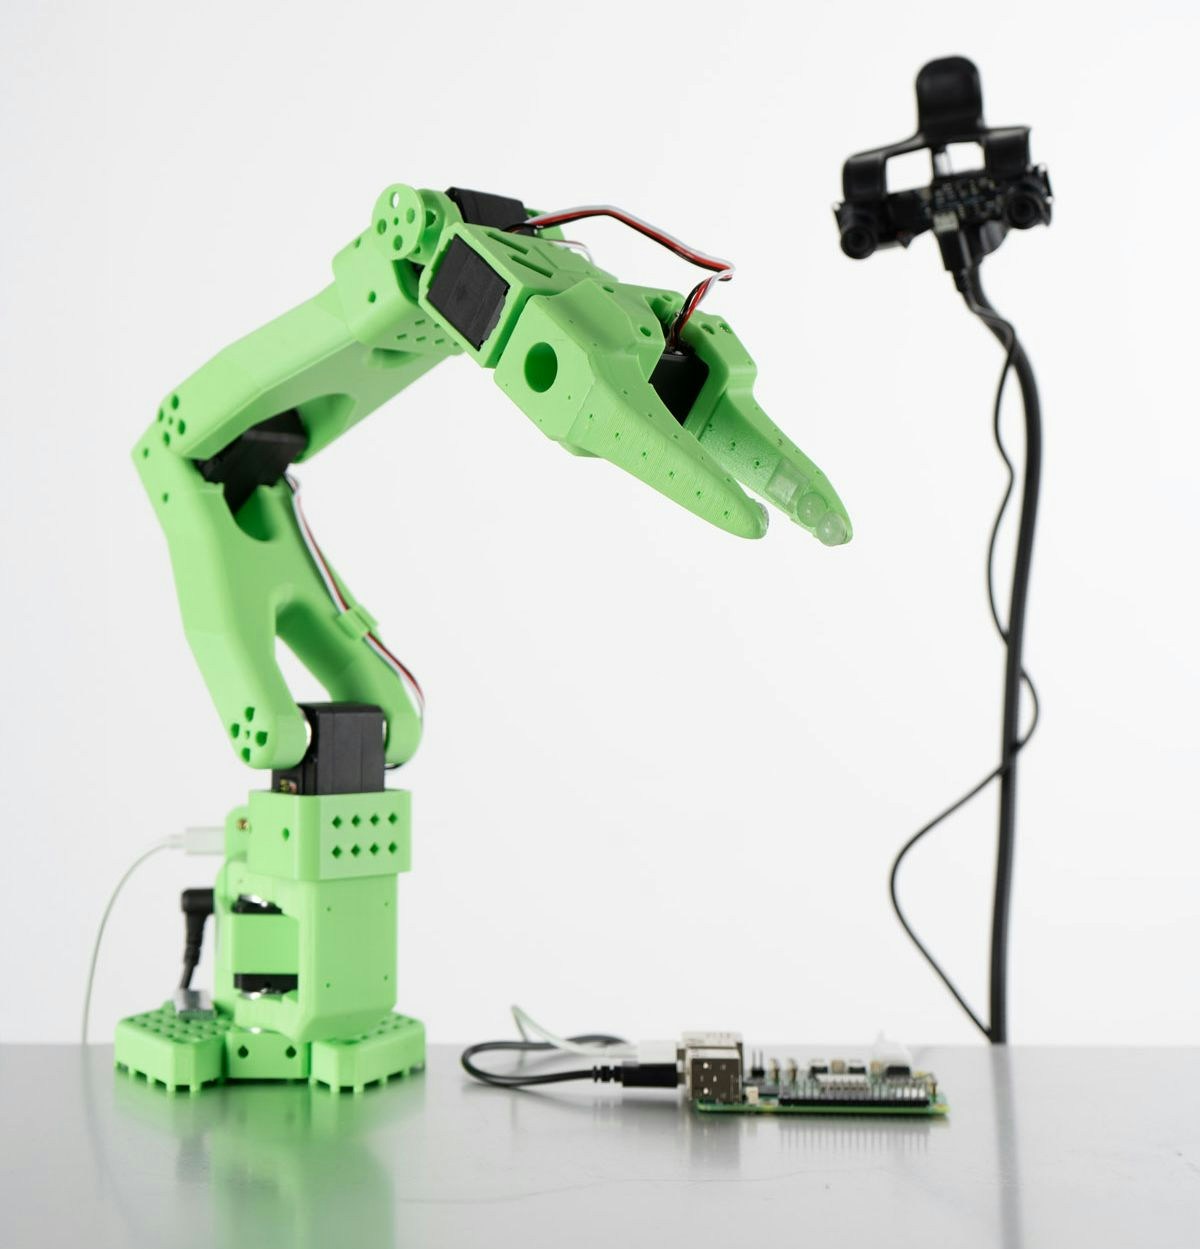 ## What's in the box?
phospho dev kits come with EU power plugs.
* **Robot arm**
* 1x SO-100 robot arm
* 1x 12V power source (for the arm)
* 1x USB-C to USB-C cable
* 1x USB-C to USB adapter
* 2x Table clamps
* **Camera**
* 1x Stereoscopic camera
* 1x USB-C to USB cable
* 1x Camera stand
* **Control module**
* 1x Control module
* 1x Raspberry Pi USB-C power supply
* 1x Micro SD card adapter
## 1. Attach the SO-100 arm
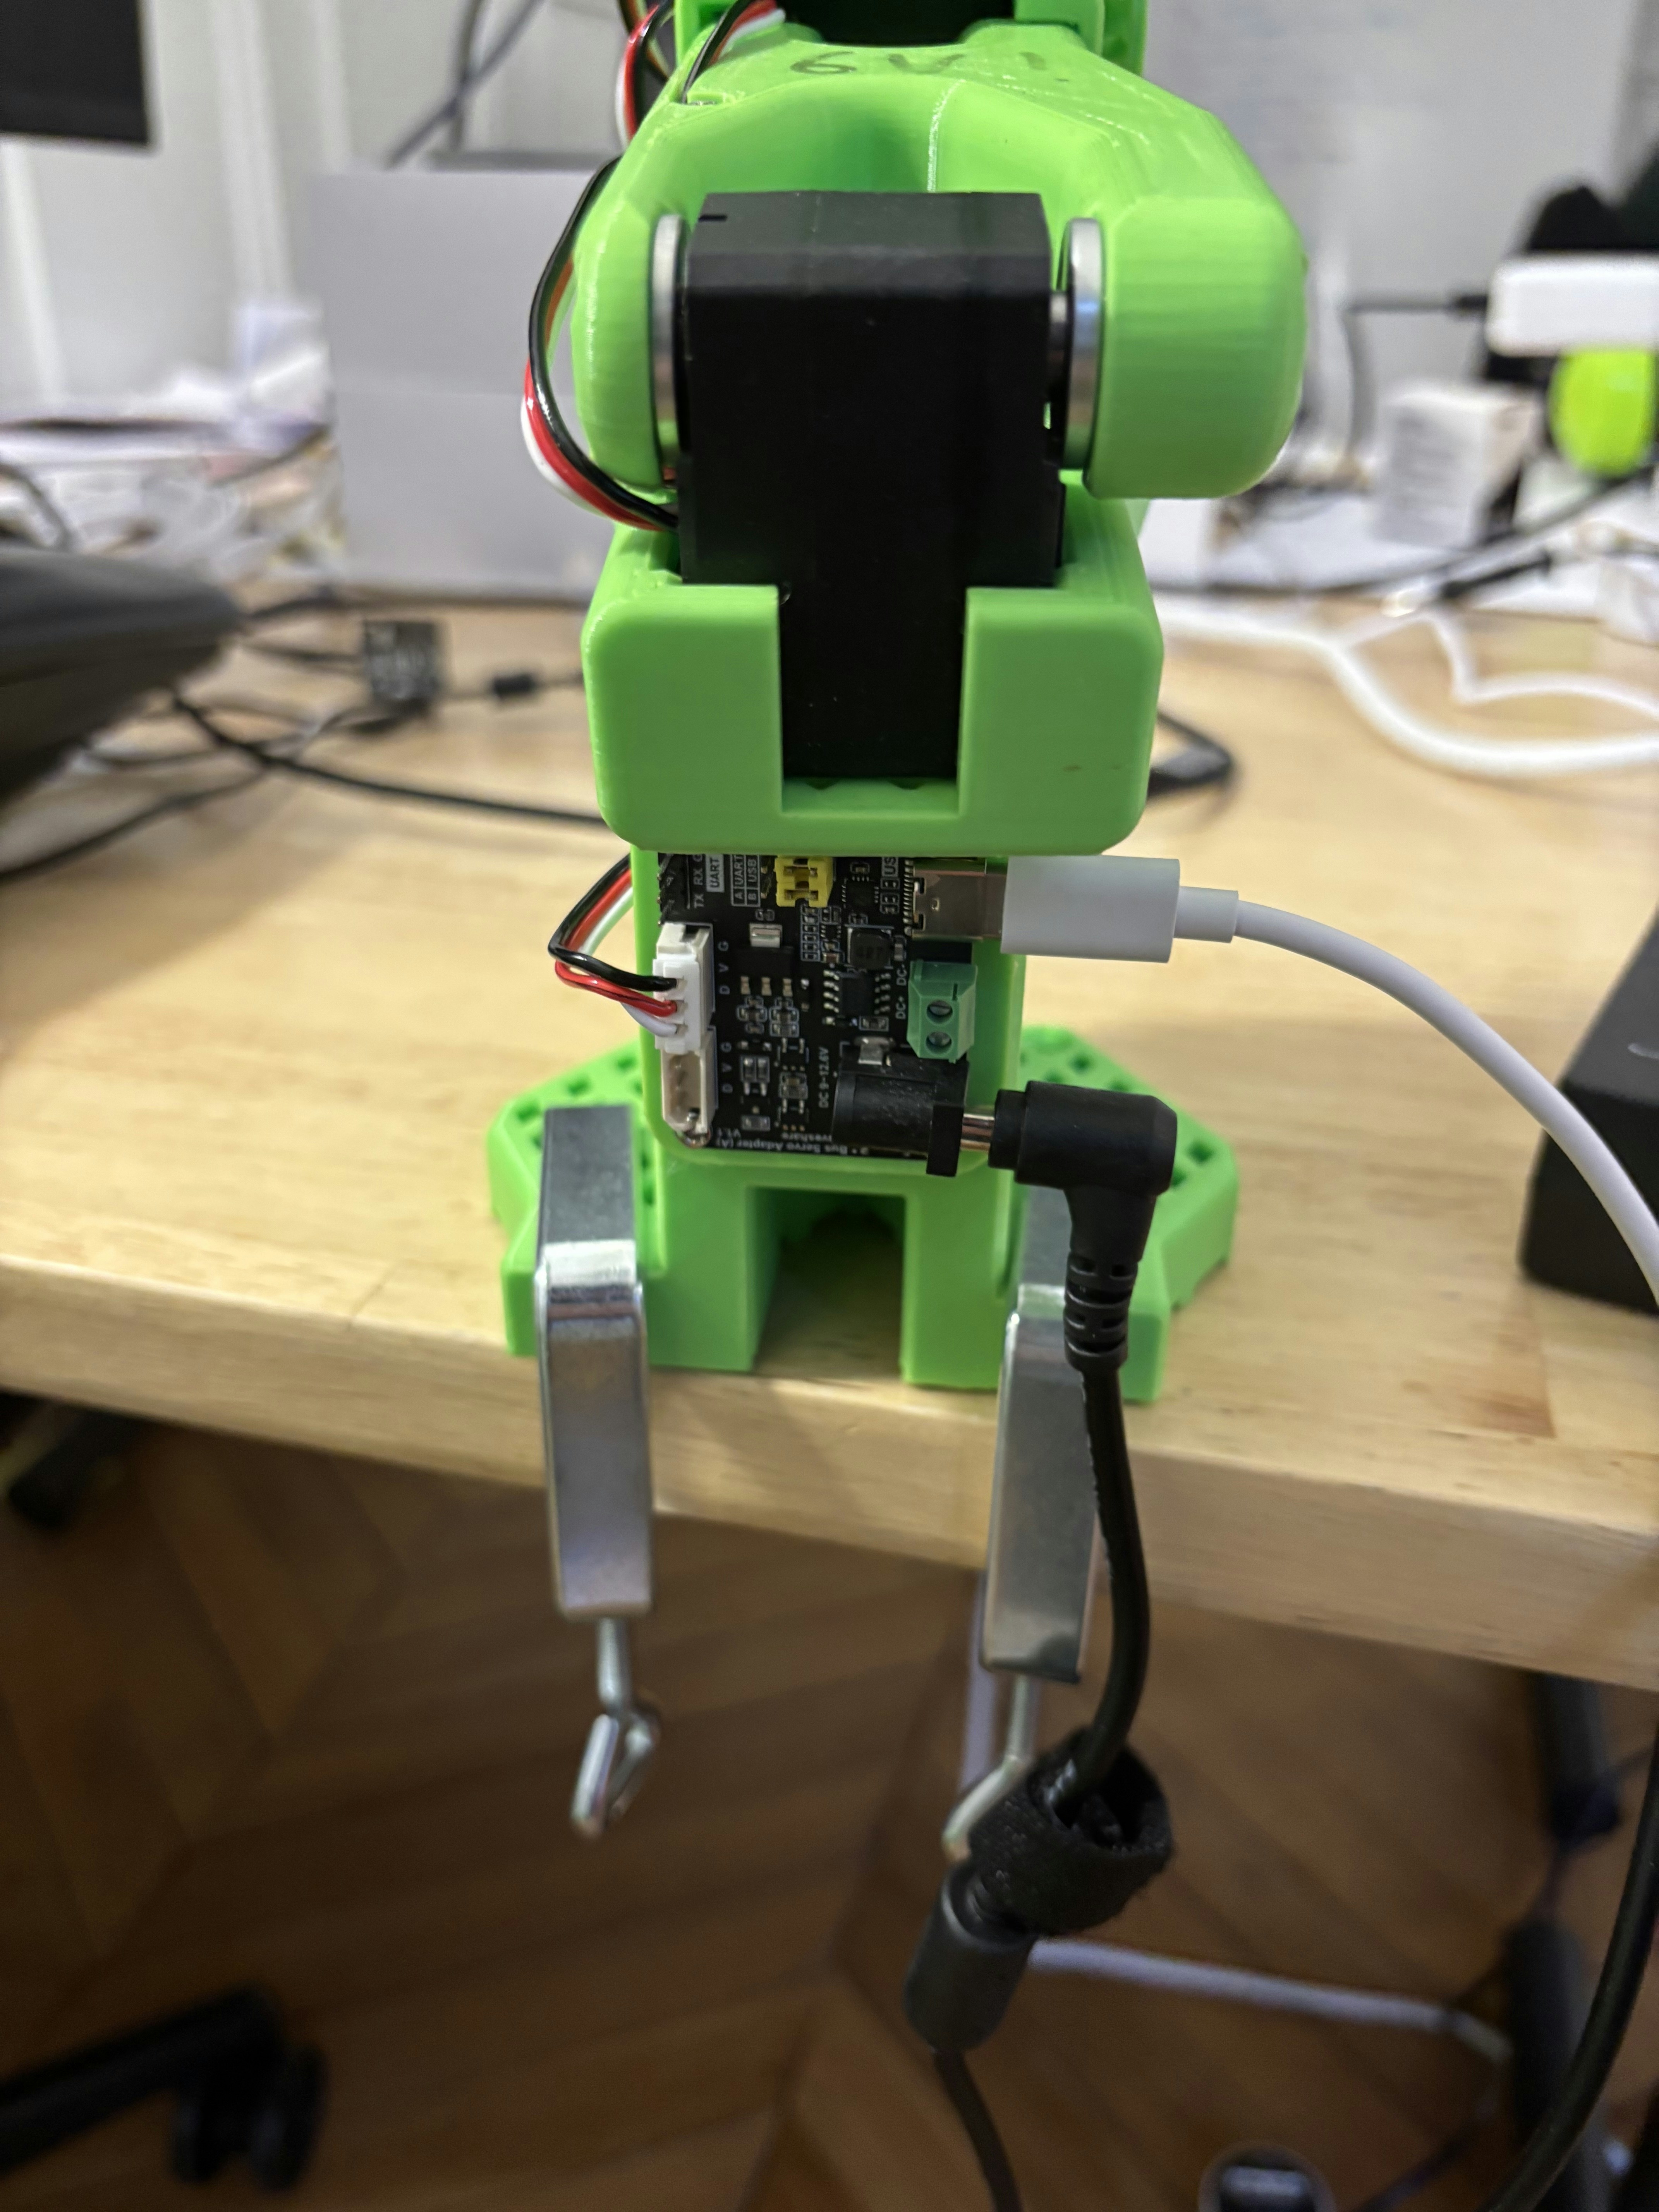
Find a table and fix the SO-100 robot arm using the 2 table clamps in the kit (see image below).
Make sure the arm is securely fastened and won't move. Clear away any clutter that could get in the way of the arm's movement.
## What's in the box?
phospho dev kits come with EU power plugs.
* **Robot arm**
* 1x SO-100 robot arm
* 1x 12V power source (for the arm)
* 1x USB-C to USB-C cable
* 1x USB-C to USB adapter
* 2x Table clamps
* **Camera**
* 1x Stereoscopic camera
* 1x USB-C to USB cable
* 1x Camera stand
* **Control module**
* 1x Control module
* 1x Raspberry Pi USB-C power supply
* 1x Micro SD card adapter
## 1. Attach the SO-100 arm
Find a table and fix the SO-100 robot arm using the 2 table clamps in the kit (see image below).
Make sure the arm is securely fastened and won't move. Clear away any clutter that could get in the way of the arm's movement.
 ## 2. Plug everything together
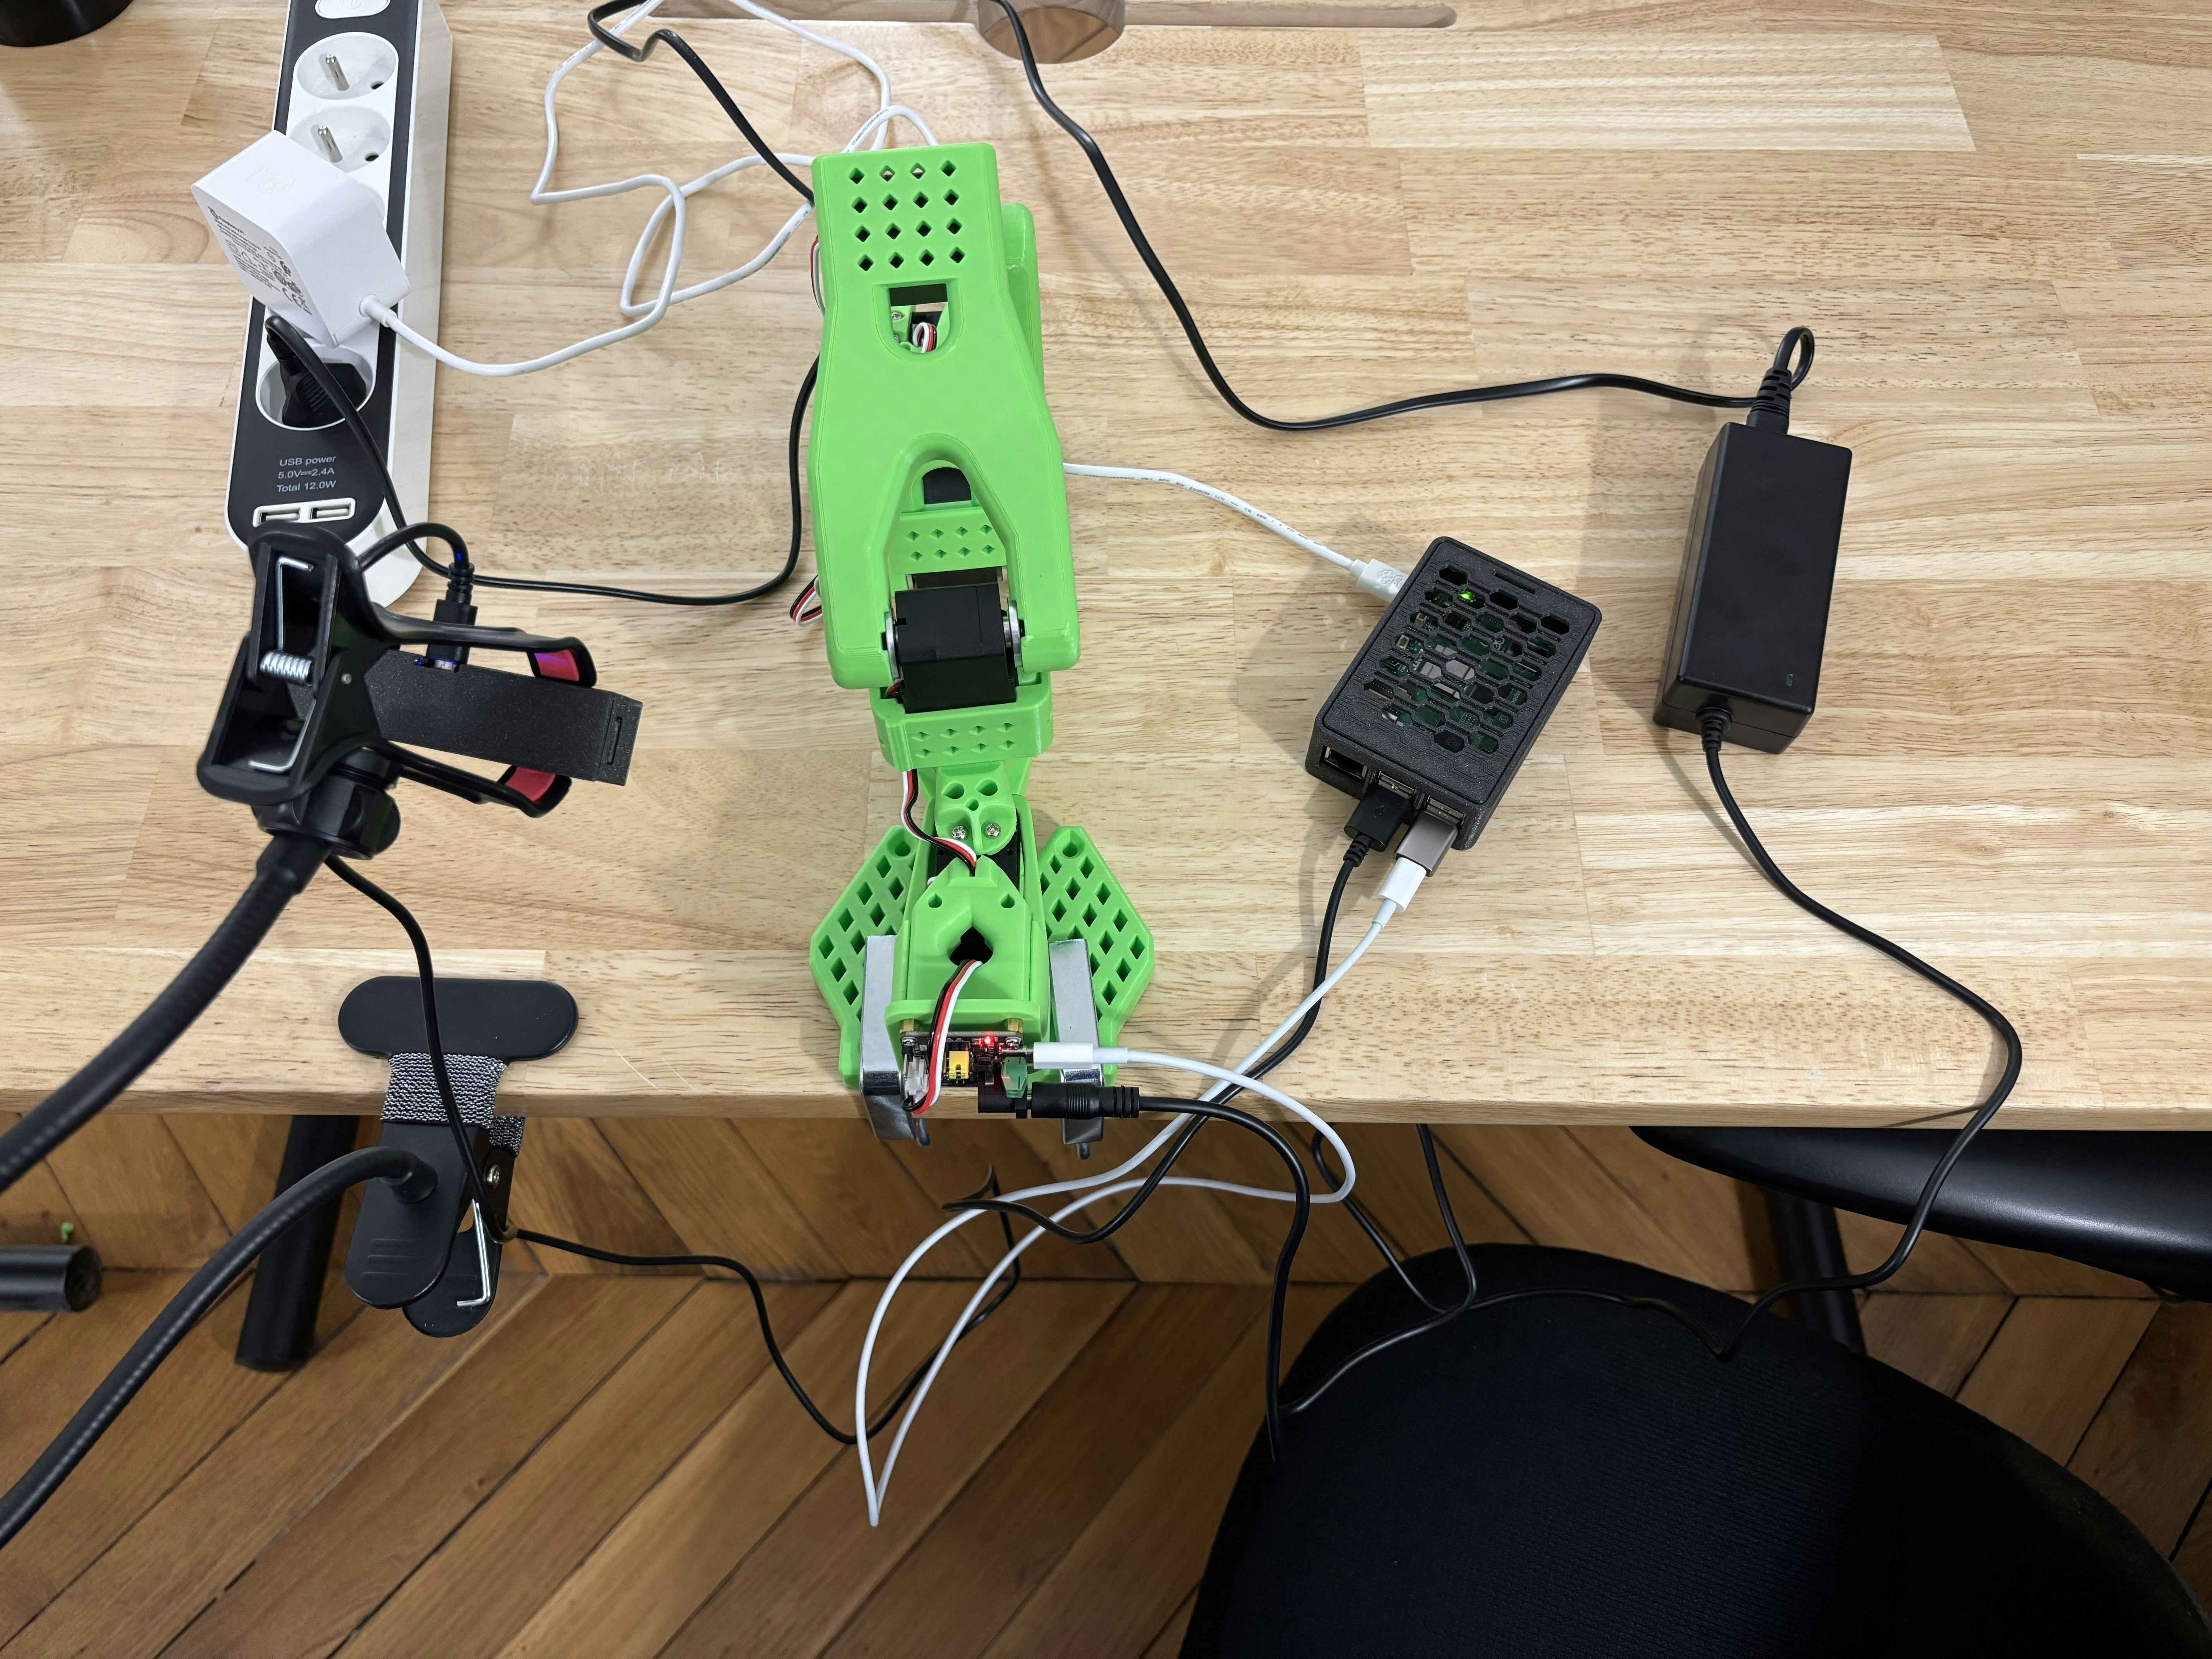
In this order:
1. Plug the *SO-100 robot arm* into the power supply using the **black** 12V power supply.
2. Plug one end of the **USB-C cable** into the *SO-100 robot arm* and the other into any **front USB port** on the **control module** (use the USB-C to USB **adapter** in the kit).
3. Attach the **stereoscopic camera** to the **camera stand** and place it next to the robot arm.
4. Plug the **stereoscopic camera** into one of the control module **front USB ports**.
5. Plug the **control module** into the **white** power supply (this goes into the **USB-C port on the side of the control module**).
## 2. Plug everything together
In this order:
1. Plug the *SO-100 robot arm* into the power supply using the **black** 12V power supply.
2. Plug one end of the **USB-C cable** into the *SO-100 robot arm* and the other into any **front USB port** on the **control module** (use the USB-C to USB **adapter** in the kit).
3. Attach the **stereoscopic camera** to the **camera stand** and place it next to the robot arm.
4. Plug the **stereoscopic camera** into one of the control module **front USB ports**.
5. Plug the **control module** into the **white** power supply (this goes into the **USB-C port on the side of the control module**).
 ## 3. Connect your control module to your home WiFi
After plugging in the control module, look at the LED indicator: it should blink **four times quickly** and then pause. This means it is in **hotspot** mode (ready for setup).
Now, let's connect the control module to your home WiFi so it can communicate with your devices.
### Connect to the control module hotspot
Using your computer or phone, connect to the control module's WiFi network:
* Open the WiFi settings on your device
* Look for a network called `phosphobot` in your WiFi list and connect to it.
* Enter the password: `phosphobot123`.
### Access the control module dashboard
In your browser, go to [phosphobot.local](http://phosphobot.local). This is the **dashboard** to control and set up your control module.
*On Android, we recommend using the Chrome browser.*
### Connect to your home WiFi
1. On `phosphobot.local`, go to `Network Management`. Enter the **network name** (WiFi SSID) and **password** of your WiFi network.
The network name is cAsE sEnSiTiVe and should be exactly as seen on your device/router. Double-check for typos.
2. The control module will now connect to your WiFi network. If the connection is successful, the LED becomes **solid green.**
If the LED **blinks slowly** (1-second intervals), it means the connection failed. Try these steps:
* Restart the control module by long-pressing the button next to the LED.
* Reconnect to the `phosphobot` WiFi network and try again.
3. Connect your computer back to your home WiFi network (the one you entered in the dashboard).
4. Reload the page [phosphobot.local](http://phosphobot.local) to access the control module dashboard.
5. You're done! Click on `Keyboard Control` and then on `Start Moving Robot`. Follow the instructions to control the robot with your keyboard. If this works, you're ready to send your first commands.
If this fails, restart the control module by long-pressing the button next to the LED. Then, start over this section.
Every time the control module is powered on, it will check for updates and install them automatically. They will be available the next time you power it on.
Using the **BTBerryWiFi** app, you can use Bluetooth to connect the control module to your home WiFi.
*Special thanks to its creator Norm Frenette for this awesome app!*
### Step 1: Download the BTBerryWiFi app
Download the *BTBerryWiFi* app for your smartphone:
* on **iPhone,** [download the app from the AppStore.](https://apps.apple.com/us/app/btberrywifi/id1596978011)
* on **Android,** [download the app here.](https://drive.google.com/drive/folders/12l5lCZS4T8wHfdSLyCGM-hrzh64EM-zo?usp=sharing) Install it with sideloading. *Note: the free version of the Android app only works for 7 days.*
### Step 2: Reboot the control module
1. Long press the *power button* of the control module until the LED turns red.
2. Press the *power button* again and keep it pressed until the LED turns green.
3. Wait for the control module to boot up. When the LED blinks green slowly and regularly, your control module is ready for pairing.
Make sure no device is connected to the control module through WiFi.
### Step 3: Connect to WiFi with BTBerryWiFi
For reference, here's the link to the [full user guide](https://www.btberrywifi.com/).
1. Launch **BTBerryWiFi.** Accept the authorization request to use Bluetooth. Click on the button "Scan for Raspberry Pi".
2. Wait for *phosphobot* to show up in the list below, then select it.
Sometimes, you can see *no\_name* instead of *phosphobot* in the list. If so, select *no name* and carry on.
## 3. Connect your control module to your home WiFi
After plugging in the control module, look at the LED indicator: it should blink **four times quickly** and then pause. This means it is in **hotspot** mode (ready for setup).
Now, let's connect the control module to your home WiFi so it can communicate with your devices.
### Connect to the control module hotspot
Using your computer or phone, connect to the control module's WiFi network:
* Open the WiFi settings on your device
* Look for a network called `phosphobot` in your WiFi list and connect to it.
* Enter the password: `phosphobot123`.
### Access the control module dashboard
In your browser, go to [phosphobot.local](http://phosphobot.local). This is the **dashboard** to control and set up your control module.
*On Android, we recommend using the Chrome browser.*
### Connect to your home WiFi
1. On `phosphobot.local`, go to `Network Management`. Enter the **network name** (WiFi SSID) and **password** of your WiFi network.
The network name is cAsE sEnSiTiVe and should be exactly as seen on your device/router. Double-check for typos.
2. The control module will now connect to your WiFi network. If the connection is successful, the LED becomes **solid green.**
If the LED **blinks slowly** (1-second intervals), it means the connection failed. Try these steps:
* Restart the control module by long-pressing the button next to the LED.
* Reconnect to the `phosphobot` WiFi network and try again.
3. Connect your computer back to your home WiFi network (the one you entered in the dashboard).
4. Reload the page [phosphobot.local](http://phosphobot.local) to access the control module dashboard.
5. You're done! Click on `Keyboard Control` and then on `Start Moving Robot`. Follow the instructions to control the robot with your keyboard. If this works, you're ready to send your first commands.
If this fails, restart the control module by long-pressing the button next to the LED. Then, start over this section.
Every time the control module is powered on, it will check for updates and install them automatically. They will be available the next time you power it on.
Using the **BTBerryWiFi** app, you can use Bluetooth to connect the control module to your home WiFi.
*Special thanks to its creator Norm Frenette for this awesome app!*
### Step 1: Download the BTBerryWiFi app
Download the *BTBerryWiFi* app for your smartphone:
* on **iPhone,** [download the app from the AppStore.](https://apps.apple.com/us/app/btberrywifi/id1596978011)
* on **Android,** [download the app here.](https://drive.google.com/drive/folders/12l5lCZS4T8wHfdSLyCGM-hrzh64EM-zo?usp=sharing) Install it with sideloading. *Note: the free version of the Android app only works for 7 days.*
### Step 2: Reboot the control module
1. Long press the *power button* of the control module until the LED turns red.
2. Press the *power button* again and keep it pressed until the LED turns green.
3. Wait for the control module to boot up. When the LED blinks green slowly and regularly, your control module is ready for pairing.
Make sure no device is connected to the control module through WiFi.
### Step 3: Connect to WiFi with BTBerryWiFi
For reference, here's the link to the [full user guide](https://www.btberrywifi.com/).
1. Launch **BTBerryWiFi.** Accept the authorization request to use Bluetooth. Click on the button "Scan for Raspberry Pi".
2. Wait for *phosphobot* to show up in the list below, then select it.
Sometimes, you can see *no\_name* instead of *phosphobot* in the list. If so, select *no name* and carry on.
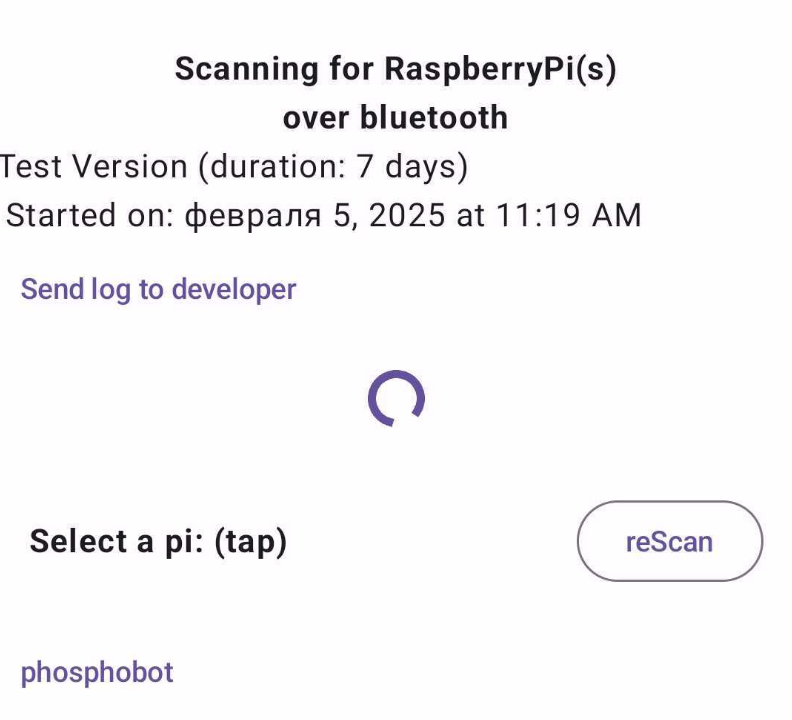 If no device shows up: close the app, turn Bluetooth off and on on your smartphone, and reboot the control module. Then start again.
3. Wait for your smartphone to pair with the control module, then for the WiFi access points to appear. This can take up to a minute.
If no device shows up: close the app, turn Bluetooth off and on on your smartphone, and reboot the control module. Then start again.
3. Wait for your smartphone to pair with the control module, then for the WiFi access points to appear. This can take up to a minute.
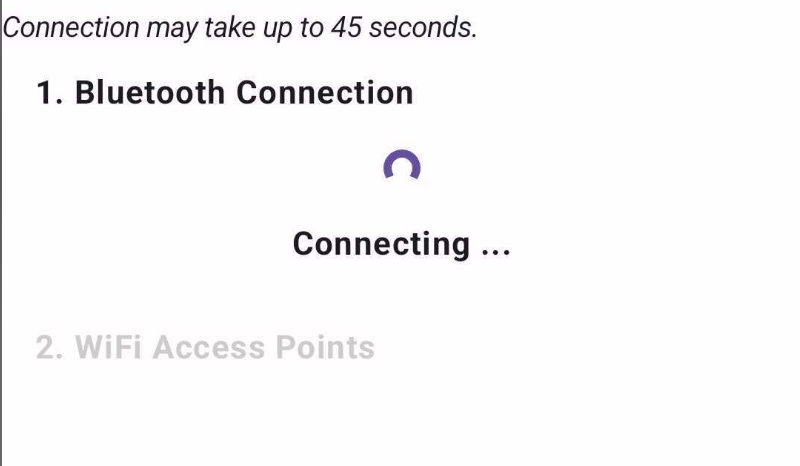 If you stay stuck on this screen for longer than 2 minutes, close the app, turn Bluetooth off and on on your smartphone, and reboot the control module. Then start again.
4. Select your home WiFi in the list. Then, enter the WiFi password. This will connect the control module to the WiFi network.
If you stay stuck on this screen for longer than 2 minutes, close the app, turn Bluetooth off and on on your smartphone, and reboot the control module. Then start again.
4. Select your home WiFi in the list. Then, enter the WiFi password. This will connect the control module to the WiFi network.
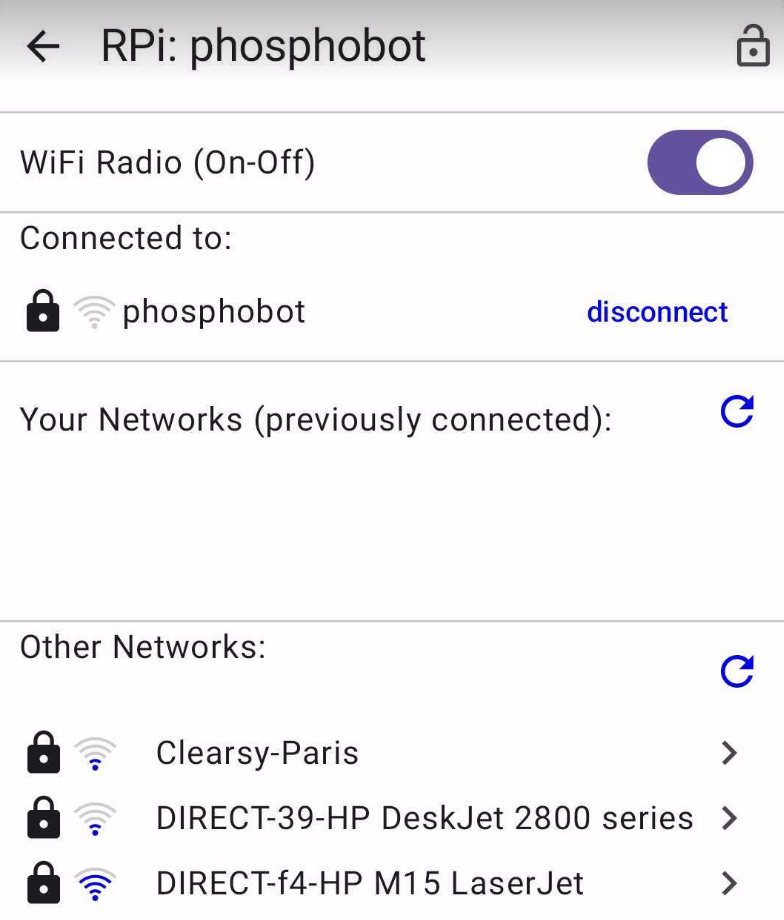 Then enter the WiFi password and press connect.
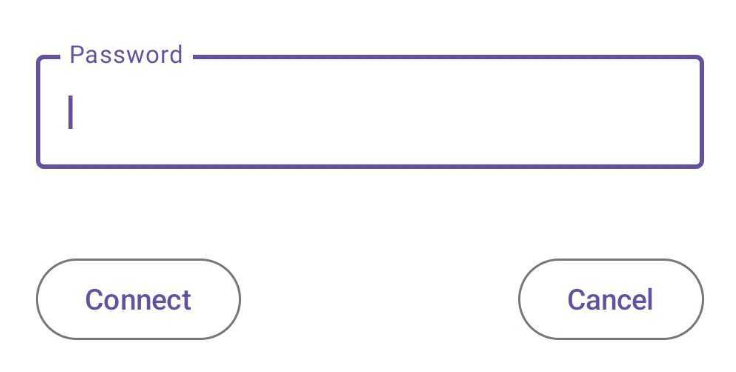 This step may fail if you're trying to connect to a WiFi hotspot. If this happens to you, learn how to flash your own SD card [using this guide.](https://phospho-ai.notion.site/How-to-setup-the-Raspberry-Pi-with-phospho-teleop-server-1848ca0b4c0480c28281eadb5d1245ee?pvs=4)
5. The control module is now connected to WiFi. Access the control module dashboard on the URL [phosphobot.local](http://phosphobot.local).
6. You're done! Click on "Keyboard Control" and then on "Start Moving Robot" to test the connection. Everything works? Great! You can follow the instruction and control your robot with your keyboard.
## What's next?
Teleoperate a real robot
How to record a dataset with your robot
How to train an AI model from a dataset you recorded
Join the Discord to ask questions, get help from others and get updates
This step may fail if you're trying to connect to a WiFi hotspot. If this happens to you, learn how to flash your own SD card [using this guide.](https://phospho-ai.notion.site/How-to-setup-the-Raspberry-Pi-with-phospho-teleop-server-1848ca0b4c0480c28281eadb5d1245ee?pvs=4)
5. The control module is now connected to WiFi. Access the control module dashboard on the URL [phosphobot.local](http://phosphobot.local).
6. You're done! Click on "Keyboard Control" and then on "Start Moving Robot" to test the connection. Everything works? Great! You can follow the instruction and control your robot with your keyboard.
## What's next?
Teleoperate a real robot
How to record a dataset with your robot
How to train an AI model from a dataset you recorded
Join the Discord to ask questions, get help from others and get updates