- your keyboard
- a game controller
- the HTTP API
- the Meta Quest app
- a leader arm or another follower arm
- by playing back a recording
- with AI
If you don’t have a robot arm, you can get hardware here.
Prerequisites
To control your robot, you need to install phosphobot. Make sure the robot was calibrated with phosphobot. No robot? Get one here.Control with a keyboard
Usephosphobot to control your SO-100, SO-101, or any supported robot arm with your keyboard, using the arrow keys to move the robot arm in the desired direction.
Go to
localhost in your web browser to access the phosphobot dashboard. Go to Keyboard Control. Click on the Start robot button to start controlling the robot arm with your keyboard. Click on the Stop robot button to stop controlling the robot arm with your keyboard.
Control with a game controller
You can control your robot arm using standard game controllers (Xbox, PlayStation, or similar) for more intuitive and ergonomic control.- Connect your controller to your computer via USB or Bluetooth.
-
Go to
localhostin your web browser to access the phosphobot dashboard. Navigate to the Control page and select the Gamepad control tab. - Press any button on your controller to activate it. The dashboard will detect your controller automatically.
- The robot will start moving automatically once the gamepad is detected.
- Left stick: Rotate (X-axis) and move up/down (Y-axis)
- Right stick: Strafe left/right (X-axis) and move forward/backward (Y-axis)
- D-Pad or face buttons (ABXY): Wrist pitch and roll control
- L1/R1 bumpers: Toggle gripper open/close
- L2/R2 triggers: Analog gripper control (0-100%)
- Start/Menu: Move arm to sleep position
The gamepad control feature requires a browser with Gamepad API support (Chrome/Edge 21+, Firefox 29+, Safari 10.1+).
Control in Virtual Reality
Control your robot arm in virtual reality with the Meta Quest app. This app lets you control your robot arm in VR, using the Meta Quest controllers.Subscribe to phospho pro to unlock VR control
Unlock access to VR Control, advanced AI training, and more.
Lifetime access to the phospho teleoperation app
Get the phospho teleoperation app on the Meta Store for Meta Quest 2, Pro, 3, and 3s.
If you bought our phospho starter pack, you should have received a link to get the phospho teleoperation Meta Quest app. Please reach out if not.
The phospho teleoperation app works with a Meta Quest. Compatible models: Pro, 2, 3, 3s.
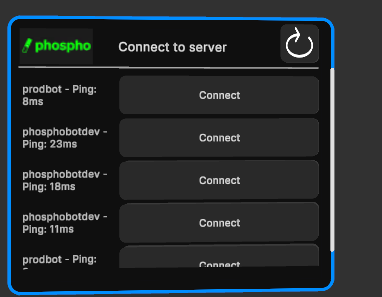
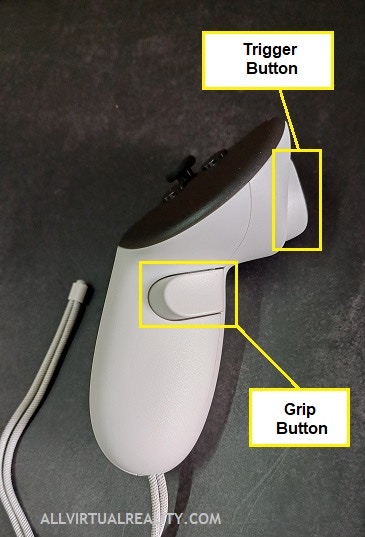
- In the Meta Quest, open the phospho teleop application. Wait a moment, then you should see a row displaying phosphobot or your computer name. Click the Connect button using the
Trigger Button.
Make sure you’re connected to the same WiFi as the phosphobot server or the control module
If you don’t see the server, check the IP address and port of the server in the phosphobot dashboard and enter it manually.
- After connecting, you’ll see the list of connected cameras and recording options.
- Move the windows with the
Grip buttonto organize your space. - Enable preview to see the camera feed. Check the camera angles and adjust their positions if needed.
We recommend disabling the camera preview to save bandwidth.
-
Press
Aonce to start teleoperation and begin moving your controller.- The robot will naturally follow the movement of your controller. Press the
Trigger buttonto close the gripper. - Press
Aagain to stop the teleoperation. The robot will stop.
- The robot will naturally follow the movement of your controller. Press the
-
Press
Bto start recording. You can leave the default settings for your first attempt.- Press
Bagain to stop the recording. - Press
Y(left controller) to discard the recording.
- Press
-
Continue teleoperating and stop the recording by pressing
Bwhen you’re done. - The recording is automatically saved in LeRobot v2 format and uploaded to your HuggingFace account.
Control with a leader arm
phosphobot supports one or multiple leader arms. A leader arm is a robot arm that you can use to control another robot arm, called the follower arm. The leader arm is used to control the follower arm in real time, allowing you to control the follower arm as if you were physically present.- Plug the leader arm.
- Calibrate the leader arm the same way you calibrated the robot arm.
- Go to the phosphobot dashboard, in the Control page and click on the Leader Arm section.
You have more than one pair leader/follower arms, using the + button to add more
Does the leader arm need to be calibrated?
Yes, the leader arm needs to be calibrated the same way you calibrated the robot arm. The calibration is done in the Calibration page of the phosphobot dashboard.Can you do bimanual teleoperation with two leader arms? Can I control two robot arms with two leader arms?
Yes, you can control two robot arms with two leader arms. You need to plug both leader arms and calibrate them the same way you calibrated the robot arms. Then, go to the Control page of the phosphobot dashboard and click on the Leader Arm section. You can add multiple leader arms by clicking on the + button.Is the leader arm mandatory?
No, the leader arm is optional. You can control the robot arm with the keyboard, the game controller, the HTTP API, or the Meta Quest app without a leader arm. The leader arm is just an additional way to control the robot arm.Control with the HTTP API
Once your phosphobot server is running, you can send your first command to the robot arm.- Go to the interactive API docs on the phosphobot dashboard: localhost/docs. On the control module, the address phosphobot.local/docs. This page lets you send commands to the robot arm.
-
Trigger the
/move/initendpoint to initialize the robot (clickTry it outand then pressExecute). - Your robot arm moves to the default position. It’s alive! 🎉
-
Now, you can call the
/move/absoluteendpoint to move the robot to a specific position. The distances are in centimeters, and the angles in degrees.
Control by playing back a recording
You can record episodes and then play them back to control the robot arm using the recording feature.Control with AI
You can train an AI model and then run AI control. Basically, the AI model will predict the next position of the robot based on the previous position and what the cameras sees. This is a whole area of research.What’s next?
Record a dataset
How to record a dataset with your robot