lerobot_v2 format from LeRobot and uploaded to your HuggingFace account.
Alternatively, you can implement your own dataset recording logic on top of the phospshobot API. Use the Start Recording Episode and Stop Recording Episode endpoints to start and stop recording episodes. You can also read the joints positions.
Prerequisites
- You need a robot arm such as the SO-100, the SO-101, or other compatible hardware. Get the phosphot starter pack here.
- Install the phosphobot software
- Connect your cameras to the computer. Start the phosphobot server.
- Complete the quickstart and check that you can control your robot.
- You have the phosphobot teleoperation app is installed on your Meta Quest 2, Pro, 3 or 3s
Subscribe to phospho pro to unlock VR control
Unlock access to VR Control, advanced AI training, and more.
Lifetime access to the phospho teleoperation app
Get the phospho teleoperation app on the Meta Store for Meta Quest 2, Pro, 3, and 3s.
If you bought our phospho starter pack, you should have received a link to get the phospho teleoperation Meta Quest app. Please reach out if not.
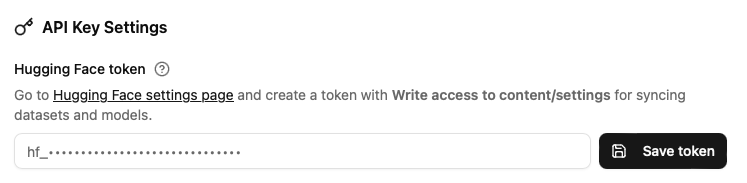
1. Set up your Hugging Face token
To sync datasets, you need a Hugging Face token with write access. Follow these steps to generate one:- Log in to your Hugging Face account. You can create one here for free
- Go to Profile and click Access Tokens in the sidebar.
- Select the Write option to grant write access to your account. This is necessary for creating new datasets and uploading files. Name your token and click Create token.
- Copy the token and save it in a secure place. You will need it later.
-
Make sure the phosphobot server is running. Open a browser and access
localhostorphosphobot.localif you’re using the control module. Then go to the Admin Configuration. - Paste the Hugging Face token, and save it.
2. Set your dataset name and parameters
Go to the Admin Configuration page of your phospshobot dashboard. You can adjust settings. The most important are:- Dataset Name: The name of the dataset you want to record.
- Task: A text description of the task you’re about to record. For example: “Pick up the lego brick and put it in the box”. This helps you remember what you recorded and is used by some AI models to understand the task.
- Camera: The cameras you want to record. By default, all cameras are recorded. You can select the cameras to record in the Admin Configuration.
- Video Codec: The video codec used to record the videos. The default is
AVC1, which is the most efficient codec. If you’re having compatibility issues due to unavailable codecs (eg on Linux), switch tomp4vwhich is more compatible.
3. How to record a dataset using the phosphobot teleoperation Meta Quest app?
The phospho teleoperation app works with a Meta Quest. Compatible models: Pro, 2, 3, 3s.
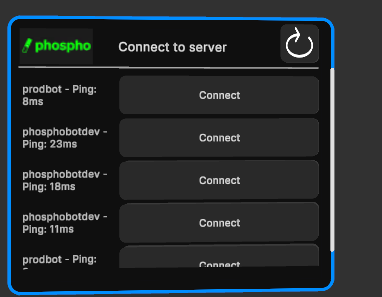
- In the Meta Quest, open the phospho teleop application. Wait a moment, then you should see a row displaying phosphobot or your computer name. Click the Connect button using the
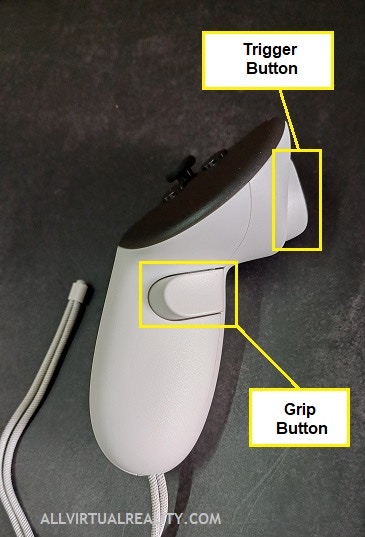
Trigger Button.
Make sure you’re connected to the same WiFi as the phosphobot server or the control module
If you don’t see the server, check the IP address and port of the server in the phosphobot dashboard and enter it manually.
- After connecting, you’ll see the list of connected cameras and recording options.
- Move the windows with the
Grip buttonto organize your space. - Enable preview to see the camera feed. Check the camera angles and adjust their positions if needed.
We recommend disabling the camera preview to save bandwidth.
-
Press
Aonce to start teleoperation and begin moving your controller.- The robot will naturally follow the movement of your controller. Press the
Trigger buttonto close the gripper. - Press
Aagain to stop the teleoperation. The robot will stop.
- The robot will naturally follow the movement of your controller. Press the
-
Press
Bto start recording. You can leave the default settings for your first attempt.- Press
Bagain to stop the recording. - Press
Y(left controller) to discard the recording.
- Press
-
Continue teleoperating and stop the recording by pressing
Bwhen you’re done. - The recording is automatically saved in LeRobot v2 format and uploaded to your HuggingFace account.
4. Check your dataset
Datasets are saved on the computer running the phosphobot server at~/phosphobot/recordings/DATASET_NAME folder in the phosphobot directory. Explore the recordings in the phosphobot dashboard using the Dataset Browser.
If you added your Hugging Face token in the dashboard, the recorded datasets are automatically uploaded to your HuggingFace account.
Go to your Hugging Face profile to see the uploaded datasets.
5. Visualize your dataset
Once your dataset is uploaded to HuggingFace, you can view it using the LeRobot Dataset Visualizer.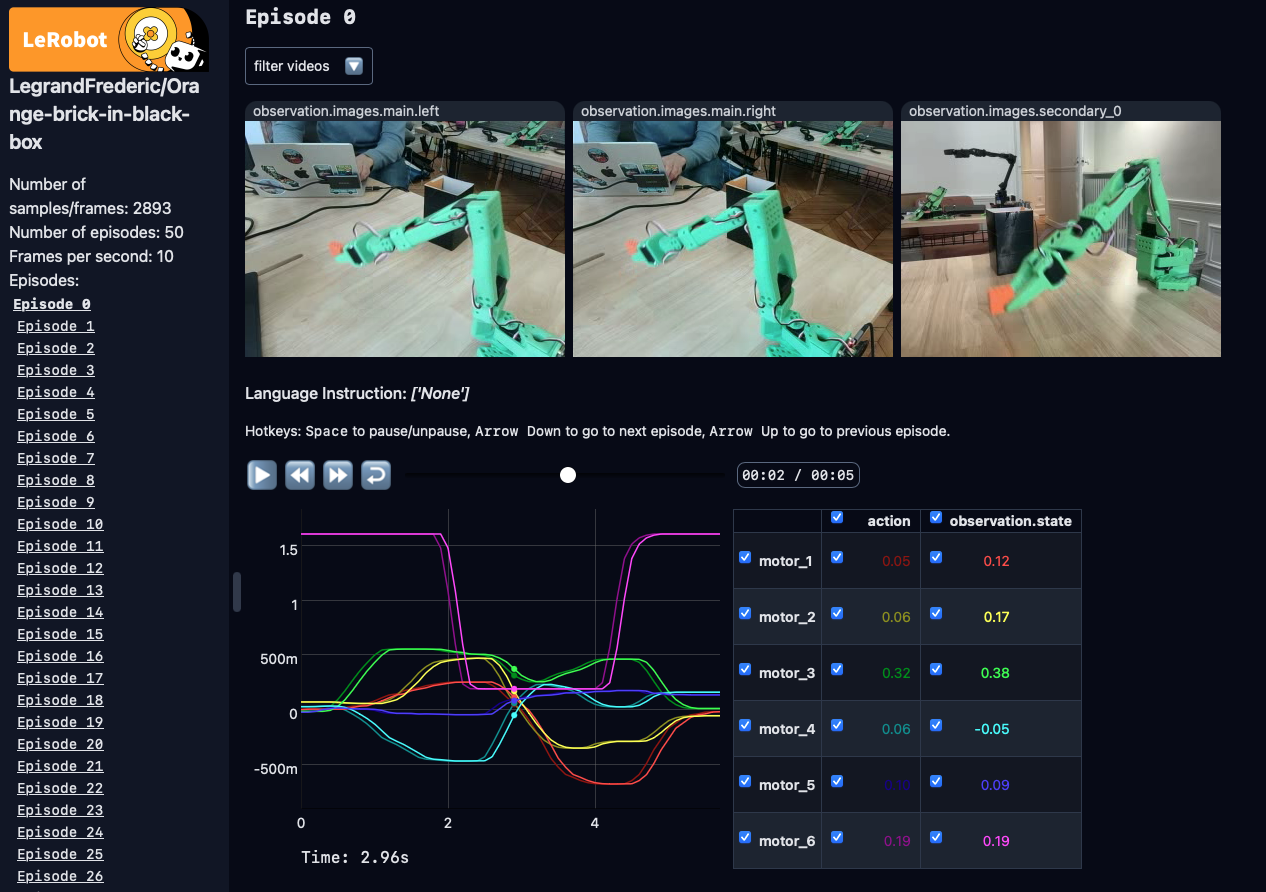
The dataset visualizer only works with the
AVC1 video codec. If you used another codec, you may see black screens in the video preview.
Preview directly the videos files in a video player by opening your recording locally: ~/phosphobot/recordings/lerobot_v2/DATASET_NAME/video.What’s next
Train an AI model
How to train an AI model from a dataset you recorded